So by now, I think it is fairly obvious that I love chocolate. However, truth be told, I’ve become sick of all the usual chocolate you can buy at the drug-store or supermarket- the likes of Lindt, Ghirardelli, Cadburys etc. I even, to be honest, am sort of over store-bought hazelnut butter- a.k.a. Nutella.
No hell has not frozen over, and no I have not been kidnapped by someone who is now pretending to be me on my blog so people don’t report me missing (if you are someone who is considering kidnapping me by the way, this tactic will never work, I talk to my parents and some close friends virtually everyday, so I would be reported missing if I didn’t answer my phone in 2 hours max.) “But Nutella is AWESOME” you exclaim or if you’re my mother or father, which you probably are if you’re reading this, you heave a sigh of relief, because until now you thought I was going to develop heart disease and diabetes and god knows what else at the very tender age of 29.
But don’t get too excited dear parents, I am NOT giving up chocolate. I am saying I am over this store-bought stuff because it’s too sweet and frankly not very good chocolate. If I could, I’d go eat pralines and truffles from Soma (this amazing chocolate store in the distillery district in Toronto) or Leonidas or Patchi or some other chocolate store that knows what they’re doing. BUT, the problem is, I couldn’t possibly afford to- considering how much chocolate I guzzle on a daily basis and considering I am but a poor doctoral candidate.
NOW I finally have the solution to this problem. Handmade, homemade truffles! And now that I’ve figured out how to make them, I simply cannot understand how I was ever able to eat that rubbish they call chocolate in supermarkets and drugstores.
In addition these truffles are the answer to my goldilocks-type problem with chocolate. My problem with most dark chocolate is that it’s not as creamy as milk chocolate; my problem with milk chocolate is that it isn’t chocolatey enough. Happily, one of the things that makes truffles magical is that they can be rich, creamy and smooth and ALSO have a strong chocolatey flavour.
If you’d like to discover true happiness as well, keep reading, because what follows, is a detailed narrative of how to make basic dark chocolate truffles.
Equipment you will need:
A cutting board and knife OR a food proccessor
2 medium sized bowls
2 plates
Parchment sheet or foil
Little paper cups to put the truffles in
Ingredients:
8 Oz (approx 225 g) good dark chocolate (at least 70-80 % cocoa solids)
1/2 cup cream (whipping cream in Canada or heavy cream or double cream elsewhere)
A dollop of butter (at room temp)
2 pinches of salt
1 tsp vanilla essence
A few tbsp of Cocoa powder
Method:
Chop up the chocolate on a cutting board into fine pieces with a large knife. This is the tiresome part of the recipe. I have a food processor, so I just break the chocolate up into individual squares and then throw it into the processor. The reason you want the chocolate broken up into fine bits is because you want it all to melt when you pour in the hot cream.
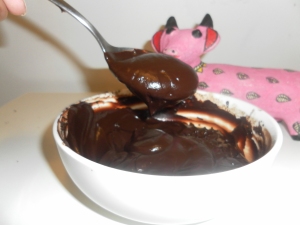
Throw the chocolate bits into a bowl. Next, get the half cup of cream just to a boil and immediately turn off the heat and pour the hot cream into the bowl with the chocolate. Using a ladle, make sure all the chocolate is covered by the cream.
Let it sit for 2-3 minutes and then delicately fold the mixture. It’s important not to be rough because then you will get air bubbles into the chocolate. That wouldn’t be good as you want the chocolate to taste smooth and rich.
 Add the dollop of butter, vanilla essence and salt and mix gently. Place the bowl in the fridge for about an hour, until it firms up. In the meantime take out the plates and place two sheets of parchment or foil on them. Once the chocolate mixture is ready take it out of the fridge and spoon out the chocolate in small portions onto the parcement or foil. The portions should be approximately the size you want the truffles to be.
Place the plates in the fridge again for about 15 mins. Take the truffles out when they’re firmed up again and roll them about in your hand until they’re more or less spherical, then place them back on the parchment. You can also try to shape them as tear drops- but good luck with that, it’ll take patience. This part of the process is so much fun! I love it because the chocolate looks and smells delicious. I would recommend washing your hands periodically in between, as you will get chocolate all over them, and it will be more difficult to shape the truffles if you’ve got melted chocolate on your hands. Also, the washing will help to cool your hands.
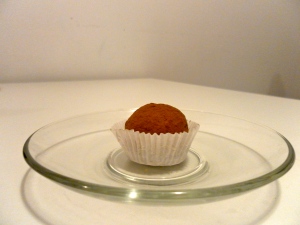
Once you’ve shaped all the truffles, take another bowl and put about 2 tbsp of cocoa powder in it. Take each truffle in your hand, roll it about for a second or two, just enough to warm the surface and then roll the truffle in the cocoa powder, until it is covered. Then place it in a paper cup. Repeat until all the truffles are done.
Mmmm they will taste delicious. You can put them in the fridge for two weeks or more, but take them out a few hours before you serve them- so that they’re at room temperature.
These basic truffles were so good, that I’ve tried quite a few variations too, such as, dark chocolate truffles with hazelnut butter-cream filling; truffles with a hazelnut centre that are coated with toasted, crushed hazelnuts; and dark chocolate truffles with a hint of orange. I will post pictures and recipes of these variations soon!

