Categories
Chocolate Food General Recipes

A Cure for Dark Winter Afternoon Blues

I’ve been remiss again, and for this I apologize. The life of a grad student is often erratic, and various deadlines have kept me from writing about my food-related adventures. Happily, they haven’t entirely prevented me from having said adventures. So, now that I have some time again, I shall return to chronicling my chocolate and spice related capers.

Despite my happiness at having a bit more free time though, there is a cloud in my otherwise blue sky. A literal cloud, in fact, because winter has arrived, bringing with it cold, dark afternoons :(. Finally, I understand why people who live in Canada, the northern U.S and northern Europe are so obsessed with the weather. It’s actually depressing to not see or feel fuzzy, yellow sunshine for months on end. (I mentioned these places in particular, because these are the cold parts of the world that I’ve lived in. I realize of course that there are other cold places, I’ve just never lived there and so, have no idea if people there are obsessed with ‘The Weather’.)

And then suddenly, a few weeks ago, I stumbled upon a cure, a magical, instantaneous cure for winter blues, namely: hot chocolate. All you need is a few minutes in the kitchen to stir up a nice cup of hot, chocaltey richness, and you’re all set. You can curl up on your couch with a blanket and a good book, and a soft pair of socks on your feet (ideally a cat is also included in this scenario) and winter will actually seem bearable.

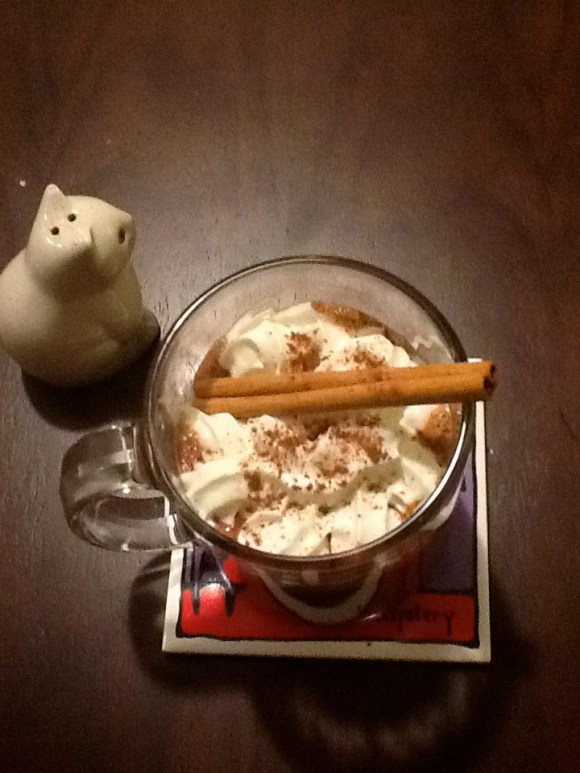
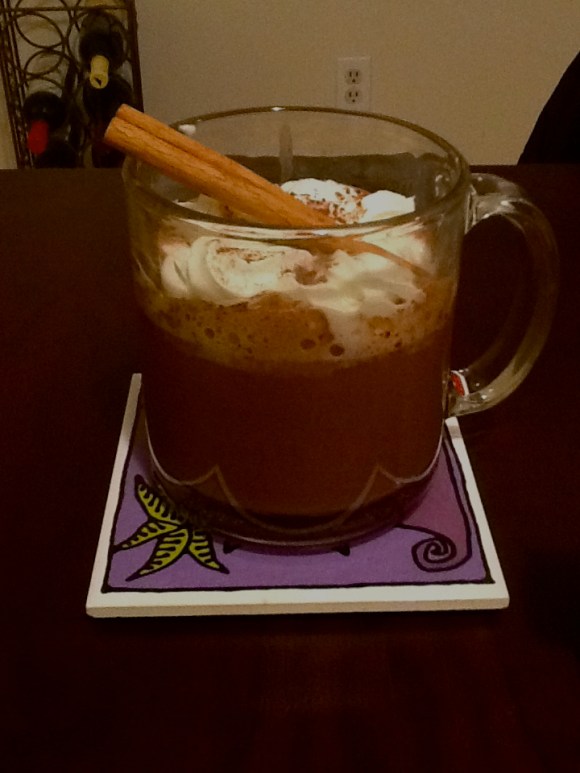
Don’t believe me? Just look at this:

photo-22

I’ve taken to making myself a cup every once in a while 🙂 I use homemade chocolate fudge ice-cream topping to make the hot chocolate, rather than cocoa or chocolate flakes. If you’d like to recreate this deliciousness, it’s fairly simply. Just warm up 2/3rds of a cup of milk. Then dissolve 2-3 tablespoons of homemade dark chocolate fudge into it. Here is a recipe for a velvety, homemade dark chocolate fudge that I strongly recommend; it’s super yummy and super-easy to make. (It is also delicious on ice-cream, which is what I originally made it for.)

Once you’ve dissolved the fudge, top off the hot chocolate with some whipped cream and stick a cinnamon stick into the cup:

photo-23

Finally, sprinkle some cocoa powder on the cream, and sip away! If you’ve got a cookie to go with it, more power to you. I think my next post will be about the dark-chocolate-chunk cookies that I am now about to go and bake 😛 Mmmm.

photo-24

Categories
Chocolate General

The Perfect Pick-Me-Upper on a Cold, Wet, Awful Fall Evening

I am not much of a coffee drinker. I barely ever drink coffee actually, although I do like a tisane or a flavoured green tea every once in a while. However, because I find myself having to spend long hours at my desk in front of this computer, painstakingly writing, footnoting and editing my thesis, over the past week, I’ve resorted to coffee. The problem though, is that it tastes awful. Coffee smells absolutely heavenly, which is why I use it in baking (my espresso buttercream icing is a case in point) and chocolate-making, I even just sniff coffee-bean jars sometimes, but I am not a fan of its taste. I know, I know, all you coffee lovers out there might object on the ground that I might not be buying the right beans, or grinding them fresh etc., But, dear readers, I’ve never, absolutely never, liked the taste of coffee. No matter how it was made and no matter what beans were used, the taste of coffee never appealed to me.

Therefore, today, I decided to try complimenting my cup of coffee with flavours that I do like. I brewed myself a cup (I used a milk frother and steamed milk by the how, so my coffee would turn out more foamy) and then added 3 dollops of my velvety hot chocolate fudge (go here for the recipe) and one and half teaspoons of Frangelico liqueur.

I have to say, it turned out pretty darned good, for a homemade cup of coffee made by a complete amateur! It was a perfect hazelnutty, chocolatey accompaniment to copyright law on this cold, wet, depressing evening.

Chocolatey hazelnut coffee on a grey day.

I did of course top the coffee off with a generous helping of whipped cream and a sprinkling of cocoa powder.

 Hazelnut and chocolate coffee whipped cream and a sprinkling of cocoa powder.

Now I am all perked up and energetic. Also, I feel strangely warm and fuzzy, it must be the booze 😛

Categories
Cooking Food General Indian Cooking Recipes

Miriyala Pappu-Charu/Rasam (Low-Fat Peppery Lentil Soup)

Summer is clearly over, and as climate-change enthusiast Ed Stark has been known to say, ‘winter is coming’ (if you don’t get this reference, google ‘Game of Thrones’). In fact, I prefer the cold winter to these months of pre-winter anticipation otherwise known as fall; at least in the winter there is the hope of snow. And so, I woke up this morning feeling a bit peevish. It was a little chilly and I really didn’t want to leave the warm-coziness of my wonderful duvet.

Unfortunately, get up I had to, because a thesis does not write itself. I motivated myself with the prospect of a cup of rich Italian hot chocolate (the kind that is so viscous it takes about 10 minutes to empty a cup of it even when you are holding the cup completely upside down). But as I made my way downstairs to the kitchen, a new craving hit me: I wanted some spicy, garlicy steaming hot charu! Charu or Rasam, a famous South Indian creation, is best described in English as a spicy soup. One can make it with or without lentils, and various types of souring agents can be used in it, including tamarind and lemon juice. What I was craving was a particular type of charu that is a quite common in Andhra Pradesh: ‘Miriyala (pepper) Charu’. So I set about grinding some fresh spices and cooking up some hot (in every sense of the word) charu for lunch.

It turned out pretty well, and now I feel cheery, warm and ready to get to editing word-documents (otherwise known as thesis-writing) 🙂

Recipe for peppery low fat South-Indian lentil-soup

If you’d like to try making some, here’s what you will need:

Ingredients:

1/2 cup toor/tuvar dal (split pigeon peas) (for more on these lentils see this wikipedia entry)

1/4 tsp turmeric

1 large tomato, cubed

1 lime sized piece of dried tamarind soaked in a cup of water or 1.5 tsp tamarind paste

1 tsp brown sugar

10 curry leaves

Salt to taste

For Charu powder:

1 tsp toor dal

2 tsp pepper

2 tsp coriander seeds

1/4 tsp mustard seeds

3/4 tsp cumin seeds

1-2 dried red chillies

5-6 menthulu (fenugreek seeds)

For Popu/tadka/baghar:

1- 2 tbsp ghee (for more on ghee and my recipe, go here) or oil

4-6 cloves of garlic

2 twigs/sticks of curry leaves

2 pinches of asafoetida

1 tsp mustard seeds

4 dried red chillies

For garnish:

A handful of fresh cilantro or coriander leaves

Method:

The first step involves cooking the lentils (toor dal). If you have a pressure cooker cook the lentils in it; it’ll only take about 10 minutes. Otherwise, cook the lentils in a pot with 2 cups of water and a pinch of turmeric, until the lentils are completed cooked and soft.

Next, in a large pot bring 2 cups of water and the tomato, turmeric, tamarind (use only the water if you’re using dried tamarind), salt, curry leaves and sugar to boil.

While waiting for these ingredients to begin boiling, prepare the charu powder. Place all the ingredients for the powder in a dry grinder or blender and grind them to a coarse powder. You can also use a mortar and pestle, but this will require a little patience.

Once the ingredients in the pot are boiling, add the cooked lentils and charu powder, stir, cook for a few minutes, and then turn off the heat.

Now for the last step! In a small pot heat the ghee or oil and add the mustard seeds. As the seeds begin to splutter add the remaining popu/tadka/baghar ingredients. Fry until the chillies darken and the spices are fragrant. As soon as you think the spices are ready, pour the ghee and spices into the bigger pot (with the other ingredients) and immediately cover the pot with a lid. Your charu is ready! I must warn you though, this is a very spicy concoction.

You can eat it like soup:

Peppery low fat Indian lentil-soup

Drink it like a warm fall/winter drink:

Recipe for low-fat peppery lentil soup

Or eat it with hot rice and a peppery papad!

Categories
Baking Cooking Food General Recipes

Refried Beans Remixed Part II

Sometime ago, I wrote about how relatively easy it is to make refried beans. Now that I’ve figured out a recipe for beans that works for me (and by that I mean that it is a wholly vegetarian recipe and it’s super-spicy) I’ve been making refried beans a lot lately. My favourite ways to eat beans include: beans on top of rice, beans inside burritos and quesadillas, and even just beans on more beans with lots of cheese on top 🙂 And then of course, there is the refried bean pizza 🙂

My latest bean-related experiment involves mixing two iconic foods from Mexican and French cuisine respectively: refried beans and crepes. Here’s how it turned out:

Baked crepes with refried beans and cheese

If you want to try it out, here’s what you will need:

For the Filling:

One serving of re-fried beans, go here for my recipe.

Freshly grated aged cheddar, to taste

Chunks of mozzarella, to taste

1 tsp cayenne pepper

1 tsp freshly ground cumin seeds

For the crepes:

1 cup all-purpose flour (leveled)

1/4 teaspoon coarse salt

1 1/2 cups whole milk

4 large eggs

3 tablespoons unsalted butter, melted

Method:

I started by making the crepes. I just threw all the ingredients for the crepes (in no particular order) into a food processor (you call also use a blender/mixie) and whizzed them all together until I got a smooth mixture. The batter will be pretty thin, quite unlike pancake batter.

Now for making the crepes. I heated a skillet, melted a little butter on it and poured a ladle of batter on it. Then, I swirled the batter about to make a thin layer completely covering the entire skillet. I cooked the underside of the crêpe for about 3 minutes. Using a rubber spatula I loosened the edges of the crepes and then flipped the crêpe over and cooked the other side for about 2 minutes. Then I placed the crêpe on a plate, covered it with plastic wrap and repeated the crepe-making process until I’d used up all the batter. (You can also store the batter in the fridge for a day or two if you prefer.)

Now I was ready to stuff the crepes with their filling! (You can stuff and bake a couple at first and store the rest of the crepes in the fridge. Since they’re all wrapped up in plastic, they will stay fresh.)

But first, I had to pre-heat the oven, which I did to 350 F. While the oven heats up, start filling the crepes with refried beans and cheese and lining them up on a baking tray. To keep the crêpe nicely wrapped and beans snug inside, I used a toothpick.

Baked crepes with refried beans and cheese

Once the oven is warmed up, place the crepes in the oven and bake for 10 minutes or so. Monitor them and reduce the temperature, or take them out sooner if they look like they are browning too much. You just want them to be a nice golden colour with the edges starting to crisp up.

Once they are ready, take them out of the oven, sprinkle with cumin and cayenne pepper and enjoy!

Baked crepes with refried beans and cheese

If you don’t want to spend the time decorating the crêpe with cayenne pepper and cumin polka-dots like I did, you can just lightly dust the crêpe with the spices:

Baked crepes with refried beans and cheese

They made for a perfect snack while working on my dissertation.

Baked crepes with refried beans and cheese

Categories
Cooking Food General Recipes

Deceptively Delicious Super Smoothie

If you know me well, you should be sitting down for this post. In fact, I would advise strewing some cushions about the floor, just in case you should fall over in sheer shock. You see, this smoothie is not just pretty good, it’s actually ridiculously healthy, but most importantly, it contains a vegetable! Yes! A real vegetable! And I, enemy of vegetables, find it quite edible, enjoyable even!

I must warn you, it doesn’t look all that delicious.

But don’t be fooled by how unattractive it looks, it’s actually more than palatable. Remember my post about the strawberry-banana smoothie that I am now sweet on ;)? Well, this is a variation on that smoothie that I was brave enough to try out. And I am so glad I did! I get spinach into my diet now, and it’s easy and yummy! Much easier than having to find a way to stomach (literally and metaphorically) a salad!

Here’s what you need:

5-6 Organic Strawberries

A banana

A handful or so of raw, organic spinach

3-4 tablespoons of yogurt

A few splashes of milk, depending on the consistency you prefer

Two pinches of cinnamon powder

Method:

Hull the strawberries:

Wash a handful of spinach, this is about how much I used:

Now, throw the strawberries, peeled banana and spinach into a blender, along with the yogurt, milk and cinnamon powder.

Super smoothie recipe

And blend it all until even and smooth. You can add more or less yogurt and milk, depending on the thickness/consistency you prefer.

And there you have it, a perfect little drink between study breaks:

It doesn’t look all that appetizing, but I promise you, you can barely taste the spinach. All it tastes of is strawberries, banana and cinnamon.

I make sure to use organic fruits and vegetables for this smoothie because I figure there is a decent chance that they will have less pesticides than the non-organic ones. I am aware of course, of how little the use of the term ‘organic’ is regulated in the food industry.

I’ve also made a chocolate variation of this by adding a tablespoon of cocoa to the mix. I find it tastes fine without the chocolate however; I almost feel like there are too many flavours interacting with one another in the chocolate version.

Categories
Adventure General Reviews

An Island Paradise 5 Minutes from Downtown Toronto?

The Toronto Islands are surprisingly beautiful, all things considered. I’ve been before, several years ago, but it was only on a recent trip there for the first time in years, that I realized how picturesque the islands are! Obviously, they’ve got nothing on any island in the Caribbean, but for a beach in a busy metropolitan centre, it’s pretty gorgeous. Far more peaceful than the beach in Chicago, and more beautiful than the beaches on Sentosa Island in Singapore for instance, by several orders of magnitude.

I think Toronto residents often don’t get to enjoy the beaches on the Islands as much as they could and should.

Don’t believe me? See for yourself.

Best beach in Toronto

Toronto Islands

We even managed to stay long enough to enjoy a beautiful sunset:

Beautiful beach on Toronto's Centre Island

Categories
Baking Chocolate Food General Recipes

In Praise of Spontaneity and Vanilla and Espresso Buttercream Frosting

One of the things that often irks me about living in North America is how much people seem to plan and organize their social lives. Speaking broadly of course, based on anecdotal evidence from my life, I find that people in India are far more spontaneous. I think there is something nice about being able to phone a friend and make an impromptu plan for the same day once in a while. But, here, more often than not, people plan dinner parties and drinks weeks in advance.

Unfortunately, having to pencil appointments with my friends into my calendar really doesn’t work for my personality. I often find myself feeling tired, or un-social, and want nothing more than to sit on the couch with a book, but end up having to go out because I accepted an invitation weeks ago. People may have gone to considerable trouble to cook for me, or a the very least they’ve set aside time to see me, so I feel compelled to go. At other times, I have a spontaneous urge to go out and see people, but end up staying in, because I haven’t made any plans with anyone.

I realize that part of life is having to do things one doesn’t feel like doing, but when it comes to how we interact with one another, I don’t think it has to be this way, and it isn’t this way in India. Of course, the ‘impromptu system’ I am advocating has its own drawbacks. In spite of its flaws however, I prefer this system to what I see as an overly organized North American model.

Luckily, that’s all it is, a model; which means not everyone follows it and I’ve managed to find a few people here who like spontaneity once in a while too 🙂 All of this has meant that last evening, I was able to indulge in one of the small, simple joys of life, namely throwing an impromptu soiree. The plan was made frantically, over multiple text messages, sometime last afternoon. After which, I could be seen running about trying to throw some snacks together. Since spontaneity was the theme, I even decided to bake a cake! It turned out pretty well, but what I really liked about it was the icing, so I thought I would share the recipe here with you 🙂

Ingredients:

1 Chocolate Cake

4 Eggs

1 Cup Sugar

2 Pinches of Salt

3 Sticks of Butter

1 tsp Vanilla Essence

1 tbsp Instant Espresso

Method:

Place the sugar, salt and eggs in a double boiler (just place them in a heat proof bowl and then place the bowl over another bowl of simmer water, make sure not to let the bottom of the first bowl touch the water). Gently and continuously, whisk the mixture while it heats up. Using a thermometer check the temperature of the mixture periodically. When the temperature reaches 160 F, take the mixture of the heat. Now beat the mixture at high-speed until it becomes fluffy and airy and reaches room temperature. Then add the butter in, half a stick at a time, beating continuously at medium speed. Once the butter is whipped in, separate the mixture into two equal parts in two bowls.

In the first bowl beat in the espresso at high-speed until you have a really light fluffy frosting.

Next, cut the cake in half. (Ideally, when you bake the cake, bake it in two separate bowls so that you have two layers without having to slice the cake in half later). Using a spatula spread a thick layer of espresso frosting over the top of the bottom layer. You don’t have to worry about doing this neatly. Make sure to leave aside about 3-4 tablespoons of frosting to decorate the top of the cake with. Then place the top layer of the cake on top of the frosting.

In the second bowl, beat in the vanilla essence, until you have a smooth, fluffy texture.

Using a separate spatula, spread this over the top and sides of the cake. Once you have a somewhat smooth (it does not have to be flawless) surface, use a basting brush to draw fine decorative lines along the sides and top of the cake. Finally, fill some of the left over frosting into a frosting bag and squeeze little bits of it on the top the cake in whatever pattern you like.

And there you have it, a white vanilla butter-cream frosted cake with a creamy espresso layer in the middle. Mmmm.

Mine turned out a little lopsided 😦 clearly I have to work some more on my decorative skills. However, it tasted pretty darned good and got rave reviews at my party 🙂

Categories
Chocolate Food General Recipes

Velvety Hot Chocolate Fudge

Of all the lovely chocolatey treats in the world, chocolate-themed ice cream is one of my favourites. If you’ve seen my post on the best ice cream in the world you know I am not kidding or exaggerating when I say that I am hooked to chocolate filled, chocolate topped and chocolate sprinkled chocolate ice cream.

Now ordinarily, I eat my ice cream with Sanders Dark Chocolate Fudge, which is an absolutely delicious ice cream-topping that you can get in grocery stores all over Michigan. I haven’t found a decent substitute here in Canada though, and believe me, I’ve looked. So I stock up on Sanders every time I am in Michigan. When I run out, which is always fairly soon after I return to Canada, I settle for whatever generic fudge is available at my local grocery store. This makes me immensely discontent. Really, it gets in the way of me being truly happy here. Also, store-bought fudge is often filled with high fructose corn syrup and tonnes of sugar and preservatives. Given this unfortunate state of affairs, I’ve tried on 3 separate occasions to make a homemade fudge topping, following recipes from different sources each time. Alas, the result was sub-par each time.

But today, as I sat down on my couch to a new episode of “Luther”, I was struck by an idea. You see, the biggest problem with the homemade sauces I made was that none of them were gooey and fudgy enough. Also, there is a warm, velvety feeling that the Sanders fudge fills my mouth with, and I haven’t been able to re-create this texture and taste in all my fudge-making attemptsI’ve been telling myself that my refusal to use high fructose corn syrup lies at the root of my failure. “Or perhaps, it is some other, secret ingredient that I am missing”, I would think to myself morosely, in my dark moments. But the thought that came to me this evening, the question rather, was this: could it be, that the secret ingredient was caramel sauce? (Side note: I have now discovered that this inspiring epiphany was the result not of divine intervention, but a happy co-incidence. You see, I was eating caramel chocolate ice cream on the couch, while watching the tv show).

I was intrigued, I was inspired, I was impatient! I pranced over to the kitchen, and began concocting. What I ended up with wasn’t as good as Sanders chocolate fudge, but it was pretty darned delicious nevertheless. Also, I think that this recipe is slightly healthier, because I used no corn syrup or preservatives, just good wholesome, somewhat fattening ingredients 🙂 If you want to try it, here’s how:

Homemade Dark Chocolate Sauce for Icecream

Ingredients:

1/2 cup brown sugar

2 tbsp water

1 tbsp organic unpasteurized honey

1 tbsp organic grade B maple syrup

1/2 cup heavy cream

4 tbsp good quality, unsalted butter

A few pinches of salt to taste

1 tsp vanilla essence

150 g 80% good quality dark chocolate

Method:

Place the sugar, water, honey and maple syrup in a little saucepan and heat on medium heat. Don’t stir the mixture at all; instead swirl the liquid about in the saucepan once in a while. Use a basting brush dipped in water to brush down the sides of the pan if needed. Wait until the sugar dissolves and then turns a deep amber (the maple syrup will make the mixture a little brown right from the start, so wait until the mixture turns even darker), about 8 minutes.

Next, take the pan off the heat and add cream and butter to the mixture. Whisk the mixture until it is smooth.

Homemade hot chocolate fudge

Then add the chocolate, salt and vanilla essence. Mix it all up until you have a nice smooth texture.

Homemadel hot chocolate sauce

You can serve it warm, as most people like it, or you can wait until it cools and thickens. I like my sauce thicker and more fudgy, so I wait until it has cooled down before I drown my ice cream in it. Either way, whenever you’re ready, pour this delicious goeeyness on your ice cream and eat away to your heart’s content.

Homemade Dark Chocolate Topping

Pour the left-over fudge into a jar and store it in the fridge.

Homemade Dark Chocolate Sauce Recipe

Categories
Baking Cooking Food General Recipes

Refried Beans Remixed Part I

Sometime ago, I wrote about how relatively easy it is to make refried beans. Now that I’ve figured out a recipe for beans that works for me (and by that I mean that it is a wholly vegetarian recipe and it’s super-spicy) I’ve been making refried beans a lot lately. My favourite ways to eat beans include: beans on top of rice, beans inside burritos and quesadillas, and even just beans on more beans with lots of cheese on top 🙂 But now, my new favourite way to eat beans is on a pizza!

One evening, a few months ago, I had this brain wave: mixing Mexican spicy deliciousness with the most delectable and beautiful carb-related food invention in the world, namely, thin-crust pizza. I’ve been eating way too much pizza ever since.

If you want to try it out, here’s what you will need:

1. Pizza dough

2. One serving of re-fried beans, go here for my recipe.

3. One onion, sliced

4. Freshly grated aged cheddar, to taste

5. Chunks of mozzarella, to taste

6. 1-2 tbsp cayenne pepper

7. 1 tsp freshly ground cumin seeds

8. 1 red or yellow bell pepper, chopped coarsely or cut into slivers

9. 1 jalapeño, sliced horizontally

You can make your own dough, and if you have the time, I would recommend doing this. I didn’t make my own this time though. You see, I was really excited about the idea of this fusion pizza, trying to work out the various toppings I’d put on it, and I didn’t want to wait any longer than I had to. So I ran out and got some fresh dough from the deli-section of the supermarket.

I left the dough out on the counter to let it warm to room-temperature and buttered and floured a pizza pan (you should use a pizza stone if you have one). About 30 minutes later, I set the oven temperature to 360 fahrenheit, sprinkled a spoonful of flour on the counter and began working with the dough. After kneading it a bit on the counter I made the dough into a ball, flattened it gently, and kept pulling it apart, all the time moving it around and flipping it over so that it wouldn’t stick to the counter. When I’d pulled it and stretched it into something resembling a circle, I placed the dough on the pan and then slowly and patiently spread it out to the sides of the pan:

Refried- bean pizza

Because I wanted a thin crust pizza I made sure to spread the dough as thin as possible. However, I like a slightly thicker crust along the edges, so I made the outer edges thicker.

Next, I sprinkled some sliced onions on this and popped it into the oven for about 12 minutes, until it looked liked this:

Mexican pizza

That is, it was slightly cooked and the base had risen a bit. You can see little bubbles; I am given to understand that this is a good sign for a pizza base 🙂

Finally, I spread the refried beans on the base with a knife and topped this off with the rest of the sliced onions, bell pepper slivers or pieces, jalapeño slices, and cheddar and mozzarella cheeses.

Mexican-style pizza

It’s also fun to play around and make a multi-topping pizza. I did a pizza tonno combined with the refried bean pizza the very next day:

Multi-topping pizza: Re-fried beans and tuna

I popped the pizza back into the oven once I was done with the toppings, and let it bake for another 10 minutes, until the cheese had melted and the onions had crisped a bit.

Mexican pizza

You’re wondering why a (large) third of the pizza is missing aren’t you? It’s because I had to eat some of the pizza as soon as it came out of the oven, while it was still hot! The side-effects of my greed were: burnt fingertips and a picture of an incomplete pizza.

I would advise you to give the pizza a few minutes to cool; it’ll also be easier to cut and serve when it’s isn’t sizzling and just out of the oven.

Don’t wait too long though, it’s best eaten hot. Cut yourself a slice or two, sprinkle some cayenne pepper and cumin powder on top and you’re ready to eat!

Yummy refried bean pizza

I love the spicy, cheesy, softness of the pizza centre melting and folding away, leading up to a freshly baked, thicker, crisp edge..mmmm.

Categories
General

Ikea Side-Table Remixed

Like the Chair I wrote about a few weeks ago, the Lack side table I’ve had lying about my apartment for years now has always struck me as a perfect DIY project. I’ve put off doing anything about it though, precisely because it has so much potential. I’d keep having various ideas, and then, unable to settle on one, I’d just give up on thinking about it and invent a new type of chocolate truffle instead.

One weekend, I finally got around to it though, and here’s what I ended up with:

Lack Table Remixed

Here are all the raw materials I used:

Raw Materials for Lack Makeover

And of course the table itself:

Ikea Lack Table Hack

I got the idea for this project from another blogger, Lizzie, you can find her blog post here. I started by tracing the shape of the table on the underside of the wallpaper with a pencil. Next, I cut along the pencil lines, so that I ended up with a piece of wallpaper, the exact shape and size of the table.

How to jazz up a side-table

In order to make the wallpaper stick, I sandpapered the surface of the table and applied wallpaper paste all over it with a medium-sized paintbrush.

How to jazz up a side-table

The next step was a little time-sensitive; I quickly spread out the wallpaper on the table, before the paste began to dry. Then, using the rolling-pin I got rid of any air bubbles that may have formed and any extra paste.

Ikea Hack

This was a two-day project; I had to let the whole thing dry and set for at least 24 hours. The next day, I carefully peeled the edges of the wallpaper off and used gorilla glue to glue it back firmly. Again, I let this set for an hour and finally, finished off the surface with two coats of varnish made of a polyurethane base.

The next day, it was ready to be used 🙂

How to jazz up an Ikea table