I’ve never really been into breakfast; “healthy” breakfast foods have been even less interesting to me. I often just skip breakfast and eat a large lunch instead.
All that changed 2 weeks ago! On Christmas eve, my partner’s Uncle came to visit us and he brought a delicious jar of granola made on his farm along with him. The next morning, before rushing off to spend Christmas day with friends in a neighbouring city, we needed something to eat quickly. The jar of granola was just sitting there on the table, so we opened it up and tried it.
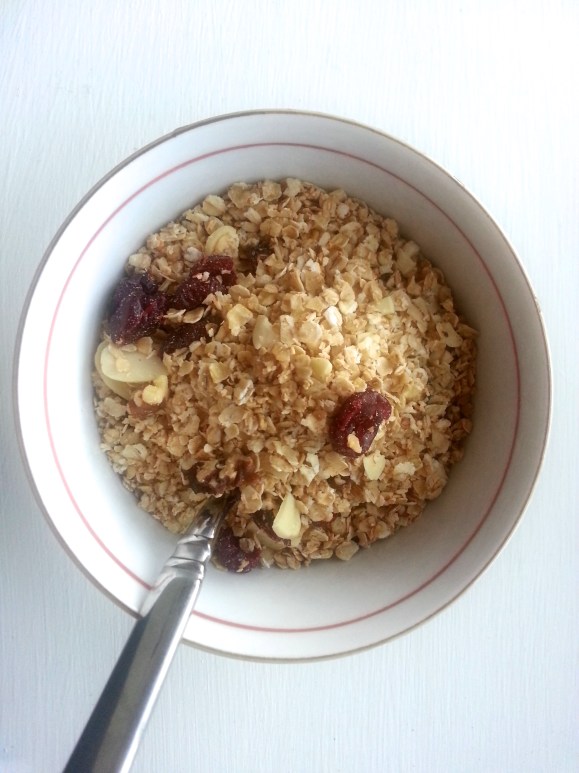
It turns out, I like granola if it’s full of cranberries and coconut 🙂
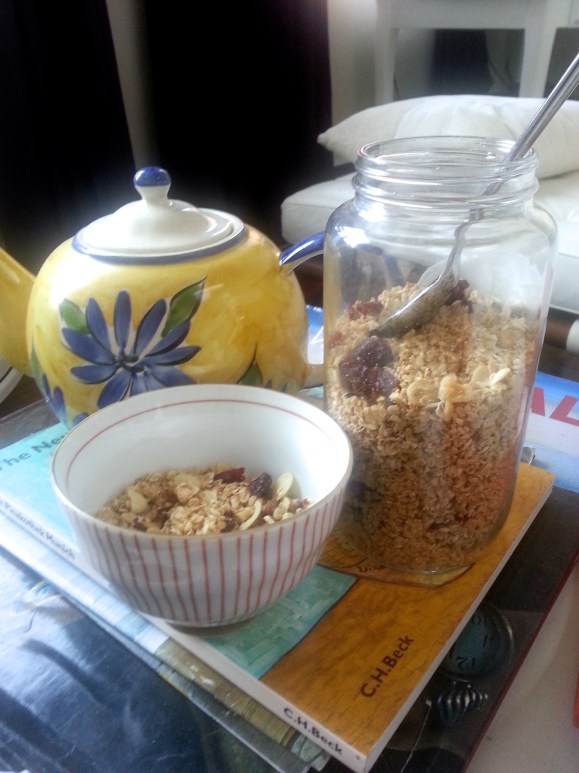
So once that jar-full of granola was gone (which was within the week), I decided to make some more myself. It’s pretty easy; it’s also filled with nutritious ingredients!
If you’d like to try making some too, here’s what you will need (I’ve divided the ingredients into groups to make it easier to describe the steps involved):
Group A:
2 cups of rolled oats
1/3 cup dried, finely grated coconut
1/4 cup chopped walnuts or pecans
1/4 cup sliced almonds
2 pinches of salt
Group B:
1.5 tablespoons virgin coconut oil
20 ml (1 tablespoon + 1 teaspoon) maple syrup (you can add more if you want the granola to be sweeter. I was trying to make a not-so-sweet version. You can also just add more cranberries at the end. I prefer the cranberry option because this means you’ll have extra little bursts of sweetness in your bowl 🙂 )
1/2 tsp vanilla essence
Group C:
Dried cranberries
Method:
Pre-heat oven to 250 fahrenheit.
Measure out and mix together the ingredients in Group A in a large mixing bowl.
Measure out and pour the ingredients in Group B into a microwave safe bowl. Now warm the bowl in the microwave until the coconut oil melts.
Pour the melted ingredients in Group B on the ingredients from Group A, mixing continuously.
Spread the mixture on a rimmed baking sheet and bake for 40-45 minutes, until golden brown, stirring every 15 minutes or so.
6. Once baked, cool the mixture and mix in the cranberries.
7. Store in an airtight container, ideally in the fridge.
Last week I decided to invite some friends over to mine for drinks, desserts, cheese, and some cheese related hors d’ oeuvres. It was my birthday you see, and what better way is there to celebrate one’s birthday than by feeding one’s friends and drinking with them? 🙂
I tried several new recipes out for this party, including three new types of chocolate truffles! Here’s one of my favourite ones: truffles with mint centers!
This was a modification of a basic truffle recipe that I came up with while fooling around with new flavours and textures; If you’d like to try it, read on!
Ingredients:
100 g dark chocolate (at least 70% cocoa solids) (the better this chocolate is, the better your truffles will taste)
1/2 cup heavy whipping cream
2 pinches of salt
5-6 tablespoons of icing sugar
5 tablespoons butter
1/4 to 1/2 teaspoon mint essence
3-4 drops green artificial food colouring
5-6 squares of dark chocolate for coating the truffles
Equipment:
4 Bowls and several spoons
1 large plate
A hand-held or stand-alone egg-beater/mixer
1 sheet of foil or butter paper
Method:
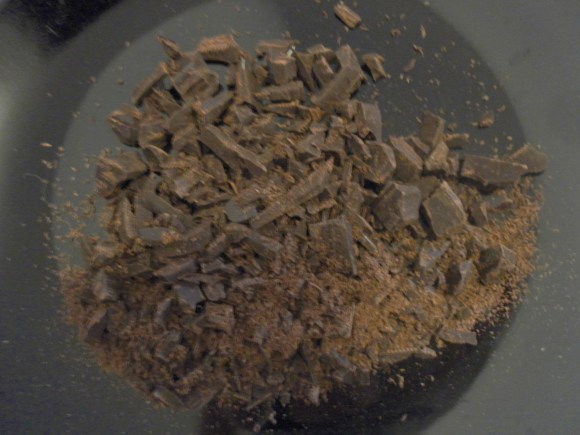
I began by heating the cream in a little pan to a gentle simmer. In the meantime, I chopped the chocolate into bits (you can also use a food processor), and placed the chocolate bits in a bowl.
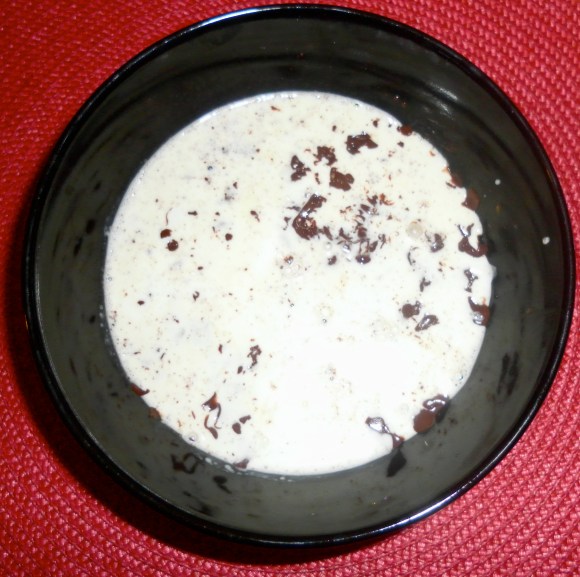
Once the cream began to simmer, I poured it over the chocolate and let it sit until the chocolate melted.
Once the chocolate was melted, I took a whisk and gently mixed the chocolate and cream into a smooth mixture adding a pinch of salt as I did this. This delicious ganache needed to cool and firm up, so I covered it up and placed it on the dining table. Once it reached room temperature, I transferred the bowl to the fridge.
While the ganache cooled, I placed the butter in a bowl and began whipping it up with a hand-held mixer (egg-beater). When it was creamy and softened, I added a pinch of salt, 2 tablespoons of icing sugar, 1/4 tsp of mint essence, and a few drops of green food colouring. I whipped all this up into a creamy smooth mix and then tasted it. I thought the mixture needed a little more sugar, so I added another 2 tablespoons. (You should also taste the mixture intermittently and see if it needs more sugar or mint essence; add as much as you think is appropriate.) Once it tasted just right, I covered up the bowl and placed it in the fridge.
Once both the ganache and mint-filling were firmed up in the fridge, I took them out and began working with them. I covered two baking trays with wax paper (you can also use baking paper or aluminum foil) and then began scooping large blobs of chocolate on one of the trays.
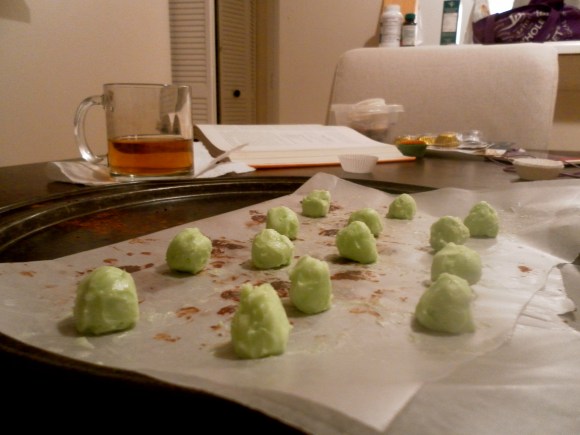
Once all the chocolate was divided into ‘large blobs’ on the first tray, I began scooping smaller portions of the mint-buttercream into my hand, shaping them into rough spheres and then placing them on the other tray.
As soon as all the mint mixture was used up, I placed both trays in the freezer for about 15 minutes. Once the scoops and mint-spheres had hardened from the cold, I was ready to start shaping the truffles!
(When you’re trying this, make sure you have enough works-space on your kitchen counter. I like sitting down while I do this, because it takes some time, so I usually move over to the floor because I feel more comfortable sitting cross-legged. You could move over to the dining table if you prefer.)
Now I was ready for the fun part! I picked up one of the chocolate scoops and shaped it into a sphere in my hand. Then I flattened it out on my hand like a mini chapathi or tortilla.
Step 1 in shaping chocolate cream cheese truffles
Then, I took one of the mint flavoured balls and placed it at the centre of the ‘chocolate chapathi’:
Step 2 in shaping chocolate cream cheese truffles
and carefully rolled the chocolate layer over the mint centre, shaping the truffle into as perfect a sphere as possible. (I don’t have a photograph of the sphere-shaping bit because I needed both hands and by this time my other hand was covered in chocolate.)
Step 3 in shaping chocolate cream cheese truffles
I repeated this until all the chocolate was used up:
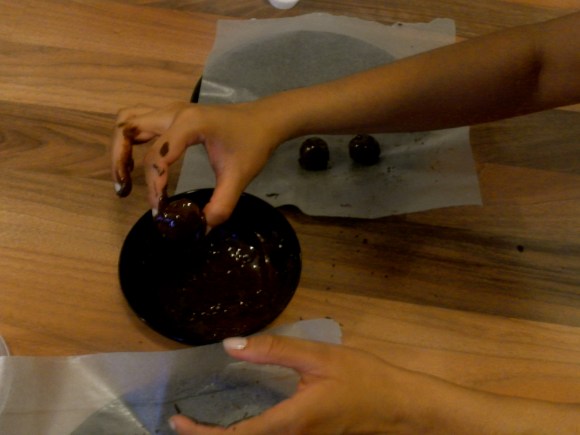
Next, I melted 5-6 dark chocolate squares in the microwave. (When you do this, be sure to do this on a low setting as you don’t want to burn the chocolate. Ideally, you should melt the chocolate in a double boiler to avoid this, but I find that if I am careful, I can do it in the microwave. After, I let the chocolate cool a bit (it’s important not to let it harden), I picked up one of the truffles, and dipped it into the chocolate, coating it completely, as shown in the photograph below:
Then, I placed the truffle back on the wax paper to cool. I repeated this until all the truffles were coated. Finally, I let them all cool and then placed them in little green-coloured paper cups.
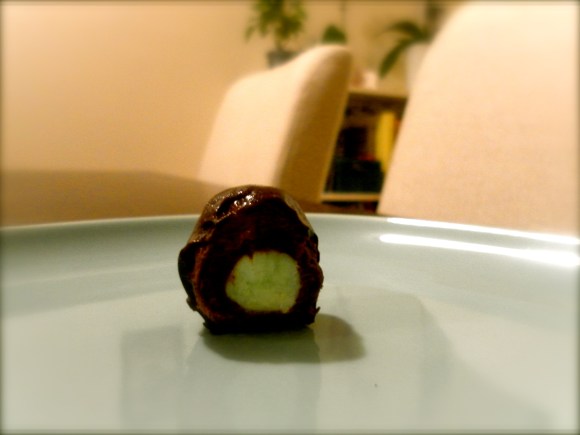
And Ta DA! They were ready to be devoured! Rich dark chocolate truffles with soft mint-flavoured butter-cream centers.
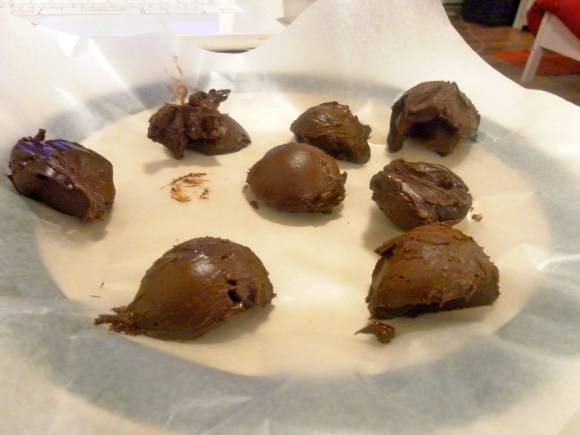
And then, all that was left was one lonely half-truffle. If it looks half-eaten, that’s because it is 😛 I did it for you all, so you can see what the centers look like 😉
Like the Chair I wrote about a few weeks ago, the Lack side table I’ve had lying about my apartment for years now has always struck me as a perfect DIY project. I’ve put off doing anything about it though, precisely because it has so much potential. I’d keep having various ideas, and then, unable to settle on one, I’d just give up on thinking about it and invent a new type of chocolate truffle instead.
One weekend, I finally got around to it though, and here’s what I ended up with:
Here are all the raw materials I used:
And of course the table itself:
I got the idea for this project from another blogger, Lizzie, you can find her blog post here. I started by tracing the shape of the table on the underside of the wallpaper with a pencil. Next, I cut along the pencil lines, so that I ended up with a piece of wallpaper, the exact shape and size of the table.
In order to make the wallpaper stick, I sandpapered the surface of the table and applied wallpaper paste all over it with a medium-sized paintbrush.
The next step was a little time-sensitive; I quickly spread out the wallpaper on the table, before the paste began to dry. Then, using the rolling-pin I got rid of any air bubbles that may have formed and any extra paste.
This was a two-day project; I had to let the whole thing dry and set for at least 24 hours. The next day, I carefully peeled the edges of the wallpaper off and used gorilla glue to glue it back firmly. Again, I let this set for an hour and finally, finished off the surface with two coats of varnish made of a polyurethane base.
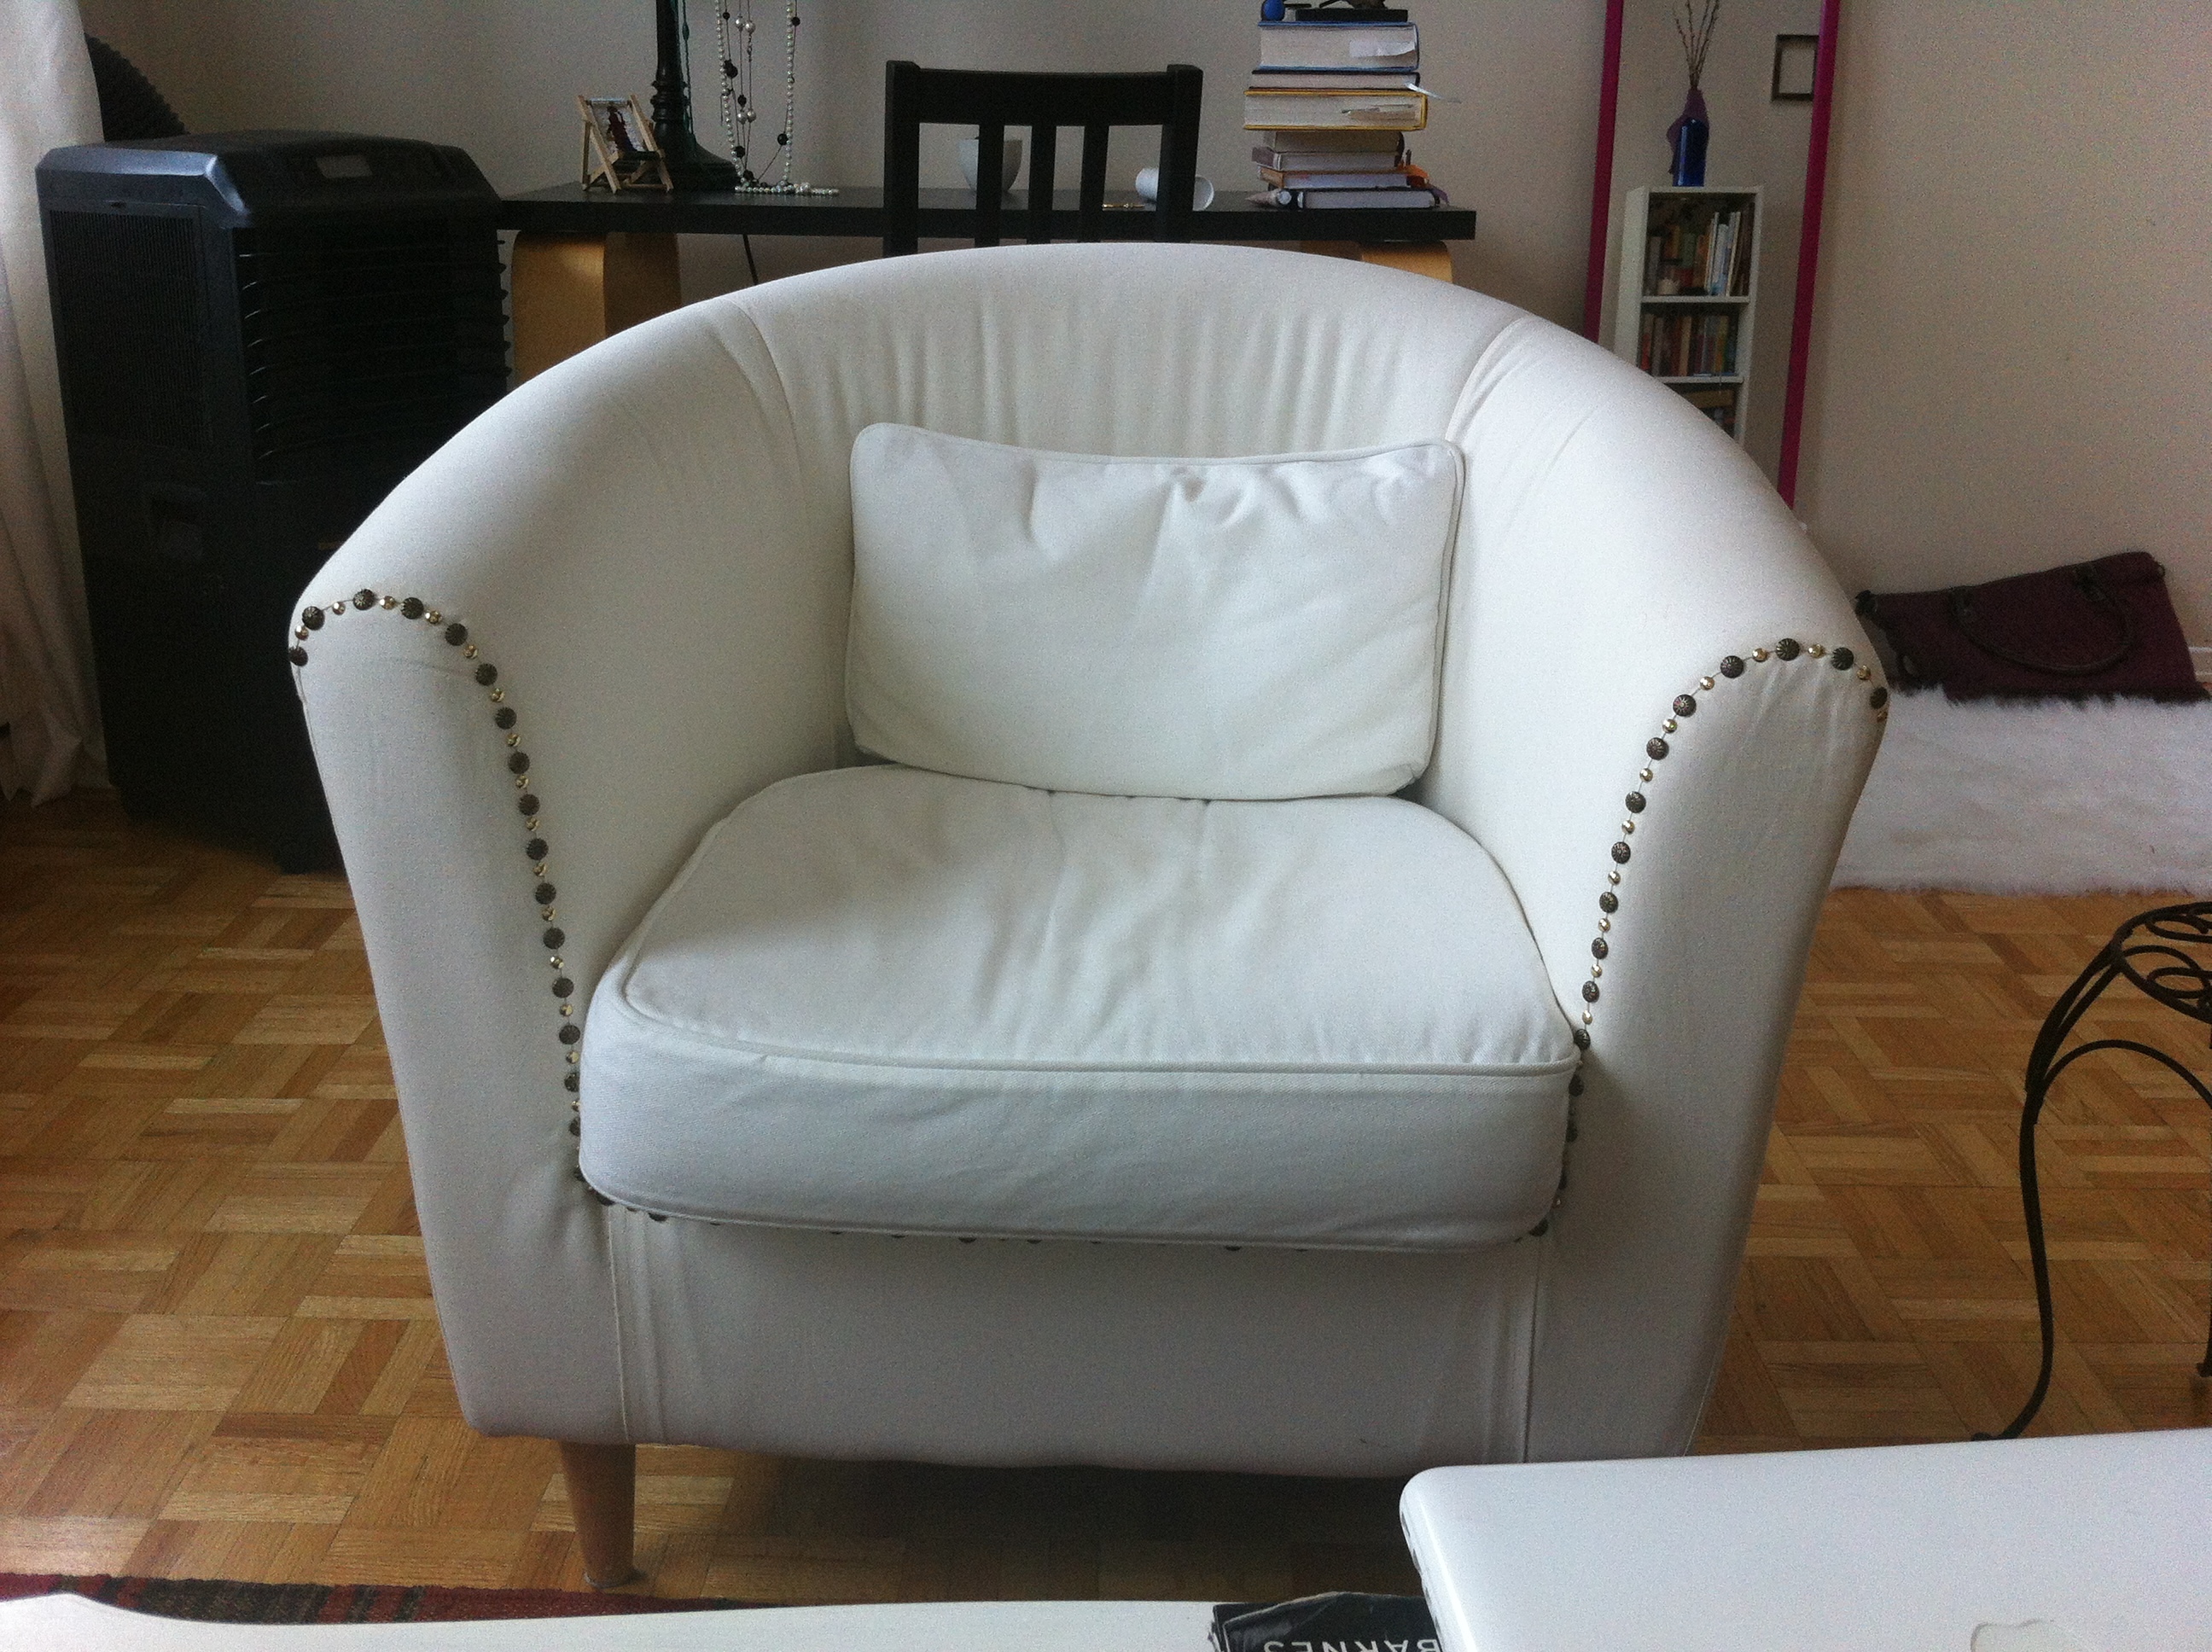
When I moved to a new apartment last month, I bought this Ikea arm-chair. It served its main purpose as comfortable extra seating well, and the colour went with my decor, but I found it just a tad-bit plain.
I thought and thought about how I could jazz it up a little, and even contemplated trying to dye the chair or reupholster it. Then, I had a simple idea that I think worked out well: why not use upholstery tacks to decorate the chair? A lot of the antique furniture I’ve seen has brass-head tacks that both hold down the fabric and serve a decorative purpose.
So, I went to various stores including home-depot and a craft store and finally found upholstery nails/tacks at Rona. This is what I did with them:
First, I stripped off the arm-chiar cover because I liked the shape of the chair and its cute legs, and both were being hidden by the cover. I kept the cushion covers on though, as that way I can take them off and wash them every once-in-a- while. Next, I used small and large tacks in an alternating pattern.
I really like the design because I think it brings out the curviness of the chair 🙂
This post is also about truffles. I thought I should just make that clear right at the start. If you’re tired of all my truffle-y posts, skip this one; my next one won’t be about truffles, or even chocolate. It’ll probably be about this delicious, spicy Hyderabadi-style fish I made yesterday; or it might be about a nice little Persian restaurant that I visited last week. Either way, it probably won’t be about chocolate.
Although, it just occurred to me that if you’re bored by chocolatey posts, you’re not really my key demographic, are you? (Really, what are you doing here if chocolate doesn’t make you ever-so-slightly unhinged?)
Anyway, this is a post about a great gift-idea: assorted chocolate truffles. This is usually an ideal little present because truffles are delicious (to most people), make people happy (quite literally (read my previous post for more on this)) and they’re very personal (you can custom-make flavours to suit your friends’ tastes). They’re also pretty easy to make, once you’ve gotten the hang of it.
The first step involves choosing flavours. You could choose from so many different kinds! Here are a few:
1. Dark Chocolate truffles (go here for my recipe)
2. Cointreau Dark Chocolate truffles (go here for my recipe)
3. Dark Chocolate Cream Cheese Truffles with Cream Cheese Centers (go here for my recipe)
4. Dark Chocolate Truffles with Orange-Cream Cheese Centers (go here for my recipe)
5. Dark Chocolate Truffles with Strawberry Cream Cheese Centers (go here for my recipe)
6. Dark Chocolate Hazelnut Truffles (recipe in this post)
7. Mint Chocolate Truffles (recipe in this post)
8. Dark Chocolate Truffles with Brazil-nut butter centers (recipe forthcoming)
I could go on and on, but I’ve got my whole life to invent truffle recipes. For now, I am going to stop thinking about truffle flavours and get on with this post.
Here’s what I chose for my first truffle-gift-experiment: Cointreau chocolate, mint chocolate and hazelnut. I chose these flavours because they’re really easy to make, easier than truffles with flavoured centers.
What you will need:
200g dark chocolate (At least 70% cocoa solids)
1 cup heavy/whipping cream
Two pinches of salt
About a teaspoon of mint essence
2 teaspoons Frangelico (or some other hazelnut liqueur)
1 teaspoon Cointreau or Grand Marnier
A handful of hazelnuts
2 tablespoons of cocoa powder
50g chocolate to dip the mint truffles in
3 sheets of parchment paper or foil
3 post-its
Coloured paper cups to place the truffles in
Method:
Chop up the chocolate with a knife and place it in a bowl:
You could also use a food processor. Next, warm up the cream until it just begins to boil and pour it over the chocolate:
Try and make sure that all the chocolate is covered. Let the bowl stand for a few minutes. Add the salt, take a whisk and gently mix the cream and chocolate. Now your ganache is ready.
Bring out two more bowls. Spoon about one-third of the ganache into one of these bowls and another third of the ganache into the other bowl. Now you have three portions of ganache in three separate bowls.
Mix in the mint essence in the first bowl, Frangelico in the second bowl and Cointreau (or Grand Marnier) in the third bowl. I would start by adding a little of each flavour and then adding more to taste. It is especially important to use the mint essence sparingly. For one thing, different brands of mint essence have varying levels of strength. Also, mint as a flavour very easily overpowers chocolate.
Let the ganache(s) cool to room temperature and then, place the bowls in the fridge.
In about an hour, check if the ganache has firmed up. If it has, take all three bowls out of the fridge. Place three sheets of foil or parchment paper on three separate plates. Take three post-its and write the names of the flavours of the truffles down, one flavour for each post-it. Now, stick a post-it underneath each plate. Next, scoop out tablespoon-sized portions of the mint flavoured ganache on the correspondingly labelled plate. Use an ice-cream scoop if you have one.
Repeat this with the other two flavoured ganaches. Place the plates in the fridge.
After about 20 minutes, take the plates out and begin to roll each scoop of ganache into as perfect a sphere as possible. Make sure not to confuse the different flavoured truffles; place all mint truffles on the plate labelled ‘mint’ and the Cointreau ones on the plate labelled ‘Cointreau’ and so on.
Once you’ve rolled all the ganache into balls, place all three plates back in the fridge for about 20 minutes.
Now comes the last step, coating the truffles.
For the hazelnuts truffles, I decided that the most appropriate coating was toasted and crushed hazelnuts. This is a simple enough coating to make. Just pop a handful of hazelnuts in the oven (preheated to 375 farenheit (that’s 180 celsius)) for about 10 minutes, tossing the nuts once during this time. Let them cool and then place them in a tea-towel and rub them against each other until they lose their skins. Then place them in a mortar and pestle and coarsely grind them. I suggested a mortar and pestle rather than a grinder because this way you can make sure you break up all the nuts without reducing most of the nuts to a powder.
Coarsely ground toasted hazelnutsAnd now for the final touch, just roll each hazelnut truffle about in your hand for a bit to make the outside of the truffle sticky and then roll it in the crushed hazelnuts. Lightly press the nuts in to make sure they stick to the truffle.
For the Cointreau truffles, I decided on a simple coating: cocoa powder. Just take a few tablespoons of cocoa powder in a bowl, warm the outside of each Cointreau truffle by rolling it about in your hand, and then lightly roll it in the bowl of cocoa until it is completely covered.
Lastly, I decided to dip the mint truffles in dark chocolate. This looks and sounds more difficult than it is, and it’s actually a lot of fun 🙂 It is also undoubtedly messy.
Carefully melt 50g dark chocolate (using either a double boiler or a microwave on a very low heat setting). Let the chocolate cool a bit (we don’t want to wait for it to harden, but we don’t want it to be too warm either).
Once the chocolate has cooled somewhat, take a truffle and dip it into the chocolate. Roll it about in the chocolate until it’s completely coated and then fish it out.
Place the truffle back on the foil/butter paper. Repeat this process with all the truffles. Once you’ve dipped all the truffles, take a toothpick and trace a circle around the bottom of each truffle. This is so that we don’t have a lot of excess chocolate stuck awkwardly to the bottom of the truffle once the outside chocolate has hardened.
Place each truffle in a paper cup. Preferably, use paper cups of different colours that compliment the truffle flavours. For instance, I used green for mint, orange for Cointreau and light brown for hazelnut. Let the truffles sit somewhere cool to cool. They should be ready in 20-30 minutes.
Since the idea was to make assorted truffles as a gift, I wanted to pack them in a nice box. I hunted all over my neighborhood for a cute gift box, but couldn’t find anything appropriate. I finally stumbled upon an arts and crafts store, and they were nice enough to cut some beautiful coloured paper for me so that I could make little bags out fo it:
I placed the truffles in these bags once they were ready and sowed on little message cards on the front that not only gave my friend my regards, but also described the different flavours of truffles included in the bag on the back.
Needless to say, my friend won’t mind taking care of my plants again 😉
Yesterday, the weather was lovely. Although the sky was cloudy and the sun managed to peek out only once or twice, the air was warm and breezy. In the evening, after a grueling Pilates class, I went out for a little stroll in the neighborhood. As I was walking past a green-grocers, it occurred to me that I ought to be healthy and buy some fruit. “I could make myself a healthy fruit shake”, I thought to myself. Going to yoga or Pilates sometimes does this to me; it inspires me to be uncharacteristically open-minded about eating healthy fruit. (It has yet to have any effect on my general aversion to veggies though; THAT would be a real miracle!)
There were several pretty, colourful and bright fruit in the store, but a little basket of strawberries drew my attention the most, and so I bought it. On the walk home, my mind did what it usually does, it wandered to chocolate. “What about strawberry chocolate truffles?” I thought to myself. “Or wait! What about strawberry cream-cheese centered chocolate truffles” I asked myself. Ooooh that sounded delicious, wonderful, so good in fact, that I set about executing my devious plan right then and there. I rushed over to the yucky supermarket across the street from my apartment and bought some cream-cheese. Three hours later, I ended up with this (I took a bite out of it so I could show you the delicious creamy center:
Dark Chocolate Truffles with Strawberry Cream Cheese CentersAnd here I am chronicling my adventure.
Since my last cream-cheese truffles (brown sugar-coated truffles with orange cream centers) came out so well, I decided to follow a similar process for today’s project. I began with a traditional dark chocolate ganache (made with cream) which I used to make the truffles themselves. Next, I incorporated the cream cheese and strawberry flavours I love so much into the recipe by making cream cheese centers for the truffles. This is the one fairly tricky part of the process. Actually shaping the truffles with the cream cheese centers can be messy and it requires patience. Finally, instead of coating the truffles in brown sugar (as I did with my last batch) I dipped the truffles in dark chocolate. They were pretty good, and if you like strawberries, you will like these EVEN more, so give them a try, why don’t you?
Ingredients for the Truffles:
100 g dark chocolate (since the strawberry cream cheese filling was a little sweet, I used chocolate with 85% cocoa solids)
Chop up the chocolate into small pieces (you could also process it in a food processor) and place it in a bowl. It’s important to chop up the chocolate into little bits so that it melts evenly when you pour the cream over it. It should look like this:
Chopped up chocolate to make a ganacheHeat the cream in a pan until it just begins to bubble and then pour it over the chocolate:
Let the mixture stand for a few minutes. Then very gently mix the chocolate and cream:
Add the vanilla and salt and mix until you have a smooth ganache:
Cover the bowl and let the ganache cool to room temperature, then place it in the fridge.
While the ganache is chilling, let’s make the cream cheese filling. The first step is making some strawberry juice. Wash the strawberries thoroughly and then hull them (for instructions on how to do this, go here). This is what they should look like:
Hulled StrawberriesChop up the hulled strawberries and then process them in a food processor or mixer:
Isn’t this a beautiful rich colour?
Strain this pulp to get strawberry juice. We’ll be using this to flavour the cream cheese.
Set the juice aside. Take another bowl, put the cream cheese in it, and whip it up with a mixer, until it’s smooth.
Softened cream cheeseNow, add two tablespoons of icing sugar and whip it all up.
Taste the mixture. If you think it needs more sugar add some more. When it tastes right, add strawberry juice to taste, one teaspoon at a time. You should add as much juice as you think tastes good, however, remember that the more juice you add the thinner the filling will become, and the thinner the filling, the more difficult it is to work with when shaping the truffles.
I had to add some more sugar at this stage to thicken it. It tasted good even with the sugar, but it was more than I would ordinarily have added. When the filling tastes just right to you, pour the cream cheese filling into an icing/frosting bag or a sandwich bag and put it in the fridge.
Once the ganache has been in the fridge for about an hour, take it out and see if it’s firmed up. It should be firm but not hard. Take a large plate and cover it with foil or butter paper. Portion out the ganache on the foil or butter paper, with each portion measuring about a tablespoon full.
Place the plate in the fridge. In about an hour, take it out along with the cream cheese filling. Now you’re ready to begin shaping the truffles.
Pick up a scoop of ganache and shape it into a ball. Flatten it on your hand like a mini-tortilla or chapathi. Next, squeeze a bit of cream cheese filling out of the frosting bag (if you were using a sandwich bag cut off one of the bottom tips of the bag) on the center of the ‘chocolate chapathi’:
Fold the chocolate over the cream cheese filling and roll the whole thing carefully into a ball. I don’t have a photograph of this because by this time my hands were covered in chocolate. Repeat this until all the ganache has been used up.
Almost Ready-Truffles!For the final step, carefully melt 50g dark chocolate (using either a double boiler or a microwave on a very low heat setting). Let the chocolate cool a bit (we don’t want to wait for it to harden, but we don’t want it to be too warm either).
Once the chocolate has cooled somewhat, take a truffle and dip it into the chocolate. Roll it about in the chocolate until it’s completely coated and then use a fork to fish it out. Place the truffle back on the foil/butter paper. Repeat this process with all the truffles. Once you’ve dipped all the truffles, take a toothpick and trace a circle around the bottom of each truffle. This is so that we don’t have a lot of excess chocolate stuck awkwardly to the bottom of the truffle once the outside chocolate has hardened. Place the truffles somewhere cool to cool. They should be ready to eat in 20-30 minutes. Serve in little paper cups. Enjoy!
This is my favourite kind of truffle so far. In fact, I can honestly say that I’ve never eaten a more delicious chocolate truffle. Mmmm.
It all started with me wandering into my kitchen last evening. I went through my fridge and cabinets, trying to think of a new combination of flavours that I’d never tried in a truffle before. All sorts of ingredients caught my attention, but my eyes kept returning to the block of cream cheese in my fridge. As I wrote in Sunday’s post about dark chocolate cream cheese truffles, I absolutely love the flavour of cream cheese. So I decided to stick with cream cheese, and see if I couldn’t come up with a slightly better version of Sunday’s recipe.
Sunday’s truffles were cream cheese truffles through and through; not only did they have cream cheese centers, the truffles themselves were made with cream cheese. While I liked Sunday’s truffles, what I found was that the texture of the truffle changes when you use cream cheese instead of heavy/whipping cream (this is what is used in traditional truffles); the texture isn’t as velvety and creamy. Generally speaking, this is an acceptable compromise to me because I love the flavour of cream cheese. But Sunday’s experiment taught me that if you’re willing to go to the extra trouble of making cream cheese centers, you don’t need to make this compromise at all! In fact, I thought that the cream cheese in the chocolate didn’t add much in terms of flavour, it was upstaged by the intense flavour of the dark chocolate and by the cream cheese in the center. I could reduce the amount of chocolate I added, but I wanted to make dark chocolate truffles, not milk chocolate ones.
Therefore, for today’s project, I decided to use a traditional dark chocolate ganache (made with cream) to make the truffles, and then incorporate the cream cheese flavour I love so much by making cream cheese centers for them. But that wasn’t all, I added a twist or two to the recipe. You see, I wanted to play around a little with the flavours in my kitchen; it would have been boring to simply recreate, with a small modification, Sundays recipe.
First, I wanted a citrus flavour to the cream cheese, so I added some orange liqueur (Cointreau). Second, I thought it might be fun to coat the truffles with something I’ve never tried before, large brown sugar crystals. But since they’re sweet, I decided to make the chocolate a bit bitter. So I replaced some of the dark chocolate in the ganache recipe with unsweetened chocolate. Here’s what I ended up with:
And boy am I glad I played instead of sticking to what I know. The truffles were just right in terms of texture and flavour! They were creamy and squishy and the cream cheese centers were gooey, soft, and a little orang-ey. To top it all, the sugar-coating was literally the sugar-coating, it balanced the bitterness of the chocolate perfectly. Here is a shot of half a truffle after I’d bitten into it. I think it illustrates the squishiness and softness I am talking about:
The flavours danced together on my tongue with just enough complexity to be intriguing; they acted in perfect concert, I had to close my eyes and savour it. I haven’t felt this excited since I discovered chocolate brazil nut butter.
If you’ve been sold by my mad ravings or these pictures, go ahead and give it a go! The only tough part of the process is actually shaping the truffles with the cream cheese centers. This can be a little messy and it requires patience.
Update: Another important thing to note is that the sugar-coating absorbs moisture. So the outside of the truffle can get wet and sticky over a day or two. The solution that I have found for this problem is to roll the truffles in brown-sugar right before (or even a few hours before) serving them.
Ingredients for the Truffles:
2.5 ounces dark chocolate (at least 70% cocoa solids)
1 ounce unsweetened chocolate
1/2 cup heavy/whipping cream
A small dollop of butter
A pinch of salt
Brown sugar to coat the truffles
Ingredients for the Cream Cheese Centers:
50 g cream cheese (at room temperature)
A dollop of butter
2-4 tablespoons of icing sugar
2-3 teaspoons of Cointreau or Grand Marnier
Method:
Chop up the chocolate into small pieces (you could also process it in a food processor) and place it in a bowl. It’s important to chop up the chocolate into little bits so that it melts evenly when you pour the cream over it. It should look like this:
Heat the cream in a pan until it just begins to bubble and then pour it over the chocolate:
Let the mixture stand for a few minutes. Then very gently mix the chocolate and cream:
Add the butter and salt and mix until you have a smooth ganache:
Cover the bowl and let the ganache cool to room temperature, then place it in the fridge.
While the ganache hardens, let’s make the cream cheese filling. Take another bowl, put the cream cheese in it and whip it up with a mixer, until it’s smooth.
Now add the butter, two tablespoons of icing sugar and a teaspoon of Cointreau and whip it all up.
Taste the mixture. If you think it needs more sugar or Cointreau add some more. When it tastes right, cover the bowl and put it in the fridge.
Once the ganache has been in the fridge for about an hour, take it out and see if it’s firmed up. It should be firm but not hard. If it’s firm take it out along with the cream cheese filling. You will also need a bowl with a few tablespoons of brown sugar in it and a large plate covered with foil or butter paper. Now you’re ready to begin shaping the truffles.
Portion out the ganache onto the foil or butter paper, with each portion measuring about a tablespoon. When you’ve scooped out the lot take the first portion and shape it into a ball. Then, flatten it on your hand like a mini-tortilla or chapathi:
Now scoop a bit of cream cheese filling onto the center of the ‘chocolate chapathi’:
Now fold the chocolate over the cream cheese.
Finally, roll the whole thing carefully into a ball. I don’t have a photograph of this because by this time my hands were covered in chocolate. Repeat this until all the ganache has been used up.
For the final step, start with one of the first few truffles you shaped. (When you work with the truffles they will get a little melted and squishy from your body heat. This is why i suggest picking up one of the first few truffles you worked on; by now it will have cooled down and firmed up again.) Gently roll it about in your hand to make the surface a little sticky. Roll the truffle in the bowl of brown sugar so that it is completely coated.
Repeat until all the truffles are coated. And there you’re all done! Enjoy your delicious truffles, I know I did 😉
This afternoon I was out grocery shopping and I saw a box of truffles in the chocolate section that caught my eye- they were ‘cheesecake truffles’. “Hmm that sounds delicious” I thought to myself. The thing is, and you may not know this about me, as much as I am a chocolate-lover, even a chocolate-addict, I am so much more when it comes to cheesecake, I am in fact, a chocolate-cheesecake-fiend.
Don’t believe me? Well it’s true and the following tale will prove it to you. You see, there is a coffee shop quite literally below my apartment and they have delicious chocolate-almond cheesecake. This time last year, I was eating one slice of cheesecake per day. Soon, things got so bad that the owner of the coffee shop, his wife and two employees of theirs, independently of each other, expressed genuine surprise bordering on concern, when they noticed how often I was running downstairs for cake. When your cheesecake supplier stages an almost-intervention, well you know things have gone too far, so I quit cold turkey.
But of course, I still have a soft spot for the cheesecake-chocolate combination. So when I saw the box of cheesecake truffles, I rushed home like a woman possessed and researched recipes. It turns out one has to first bake a cheesecake, then let it firm up in the fridge for several hours and only then can one use this hardened cheesecake as a filling in truffles. This seemed like far too much waiting, so I decided to make chocolate cream cheese truffles, which are close enough.
The process was fairly easy, and what I really liked about it was that one could add sugar and chocolate to taste. Traditional chocolate truffles are made from a ganache (you can read more about this in my previous posts about basic dark chocolate truffles and Cointreau truffles), and you can’t really add more or less chocolate, with intermittent tastings while making ganache (to be accurate, you probably could, but I think it would be a complicated process and you’d run the risk of breaking the ganache). So this really is something unique about this cream cheese truffle recipe. I’d recommend giving it a go, you might get hooked 😉
Ingredients:
100 g dark chocolate (at least 70% cocoa solids) (the better this chocolate is, the better your truffles will taste)
150 g cream cheese
5-6 tablespoons of icing sugar
1/2 tablespoon butter
1/2 teaspoon vanilla essence
Some cocoa powder or a handful of hazelnuts toasted and ground
Equipment:
4 Bowls and several spoons
1 large plate
A hand-held or stand-alone egg-beater/mixer
1 sheet of foil or butter paper
Method:
I began by placing the cream cheese (at room temperature) in a bowl.
Next, I melted the chocolate in the microwave. (When you do this, be sure to do this on a low setting as you don’t want to burn the chocolate. Ideally, you should melt the chocolate in a double boiler to avoid this, but I find that if I am careful, I can do it in the microwave.
While the chocolate was melting I began whipping the cream cheese up with the mixer (egg-beater). When it was creamy and softened, I added 2 tablespoons of icing sugar and whipped this into the cheese. I tasted the mixture and thought it needed a little more sugar, so I added another 2 tablespoons. (You should also taste the mixture intermittently and see if it needs more sugar; add as much as you think is appropriate.) Once it tasted just right, I scooped out about a third of the mixture into another bowl and place this bowl in the fridge.
To the rest of the cream cheese mixture (the 2/3rd remaining in the first bowl) I added the vanilla essence, butter and about three-quarters of the chocolate and mixed it all up with a spoon (don’t whip this). Then I took a little taste. It tasted like it needed more chocolate, so I added some more.
I repeated this until I was satisfied that it tasted just right.
Now I was ready to start shaping the truffles. When you’re trying this, make sure you have enough works-space on your kitchen counter. I like sitting down while I do this, because it takes some time, so I usually move over to the floor because I feel more comfortable sitting cross-legged. You could move over to the dining table if you prefer. So I set the cream cheese mixture and the chocolate cream cheese mixture side by side on the floor.
I also placed a sheet of butter paper on a large plate next to these bowls.
Now I was ready for the fun part! I scooped out some of the chocolate mixture and shaped it into a sphere in my hand. Then I flattened it out on my hand like a mini chapathi or tortilla.
Then, I scooped out a bit of the plain cream cheese mixture on to the centre of the ‘chocolate chapathi’:
and carefully rolled the chocolate layer over the cream cheese centre, shaping the truffle into as perfect a sphere as possible. (I don’t have a photograph of the sphere-shaping bit because I needed both hands and by this time my other hand was covered in chocolate.)
I repeated this until all the chocolate was used up:
I was almost done…the last step was rolling the truffles in ground, toasted hazelnuts (you can also use cocoa). To do this, I placed the ground toasted hazelnuts in a bowl:
Then, I took each truffle and warmed the outside up by rolling it about in my hand. Next, I rolled the truffle about in the ground hazelnuts. Once its outside was coated, I placed the truffle in a little paper cup:
I repeated this until all the truffles were coated, here they are:
Ta DA! They’re ready to be devoured! Rich dark chocolate truffles with soft cream cheese centres!
Dearest readers, I have missed you. Because I’ve been gone so long, I decided, even before I sat by my laptop, that today’s post ought to have something to do with chocolate. Given my general obsession with the stuff, it seems appropriate. “But which specific chocolate-related adventure shall I write about first?” I wondered. After all, since my last post, I’ve made three new kinds of truffles, baked a new type of cake and discovered a new chocolate store. After thinking about it for a long while, I decided to write a DIY guide to a delicious chocolate themed facial.
You see, the other day I was sitting on the couch bemoaning the fact that I hadn’t had a facial in a while. I love going to day-spas, where one can get massages and facials, sit in a sauna, jump into a cold plunge pool and/or relax in a hammam (turkish bath), amongst other heavenly activities. But being a poor grad student (who is trying to get her doctorate in something non-chocolate related) (not that this has anything to do with my story), I can hardly ever afford to go to a nice day spa, or even, for that matter an ugly, dingy one. So I decided I was going to give myself a spa-treatment at home. It felt so wonderful and the process was so relaxing and easy, that I thought I’d share it with you.
Sidebar: I have avoided writing about ‘beauty stuff’ on this blog so far, partly because I think beauty is a loaded and complicated issue. I write about ‘silly’ things here, silly things that I am oddly passionate about; this isn’t a blog about how to save the world after all, unlike my 400 page dissertation which is (about saving the world I mean) (I should have said “which will be about saving the world'” instead, that would have been clearer, because I don’t mean that my dissertation ‘is”, although, I wish it were ‘is’ because that means it would be all written…god I hope neither my supervisor, nor a grammarian is reading this!). The real problem is that I write in superlatives, with a great deal of energy and well, I don’t think I’d come across like I had a lukewarm take on any issue. So if I write about some cream that I believe will prevent me from getting wrinkles, or about how one could lose weight, I’d feel like I was endorsing a pre-occupation with these concerns. This would cause me to clarify my position and present feminist critiques of contemporary and perhaps even older conceptions of beauty. I might even feel tempted to refer to post-colonial critiques of the same. I do worry about wrinkles and things on and off, but I don’t obsess and more importantly, I don’t want this blog to be about those sorts of things, things I don’t want to be worrying about I mean.
This post however, fits squarely within the mandate I have defined for this blog, it’s weird, it makes me happy and/or it involves chocolate.
Disclaimer: Now bear in mind, I am no skin care expert. This entire blog post is based on internet research and years of going to spas; I’ve had absolutely no training as an esthetician or dermatologist.
Now that I’ve got those clarifications out of the way, let’s get to my yummy spa afternoon:
I think a facial has three important stages, exfoliation, a treatment mask and then of course hydration.
Step 1: Exfoliation
Ingredients: Green or black tea from a used tea-bag and yoghurt for the face scrub. Also, wine, chocolate and a good book as accompaniments in the bath.
Method: I think the best way to steam your face and open up your pores at home is to draw a bath and sit in it. So that’s what I did: I drew myself a nice warm bath with lavender perfumed epsom salt, and settled into the tub with a good book, a bar of delicious dark chocolate and a glass of wine. After about 20 minutes, I very gently and carefully scrubbed my face with a mixture of tea and yoghurt. I got the tea out of a bag I’d used earlier to brew up a cup of tea. This is important because I find that fresh tea is too rough on my skin, whereas tea that has absorbed moisture is less like sandpaper. It’s a great scrub because the caffeine gives me a little kick. It might do nothing for habitual chain coffee drinkers though.
Step II: Treatment Mask:
Ingredients: 1 tablespoon of organic cocoa powder, about a teaspoon of honey (make sure it’s organic, raw and un-pasteurized), the juice of a strawberry and a lot of self control. (For strawberry juice, mash up a strawberry with a spoon and then get the juice out of the pulp with a strainer. You could also process a strawberry or two in a mixer or food processor and add the juicy pulp to the mask.)
Method: I mixed the above ingredients. I recommend using as much honey as you need to get the consistency you’d like.
Next I applied this paste to my face and then, I spent the next 20 minutes trying NOT to lick it off.
To relax and distract myself from the chocolate, I gave myself a massage with my homemade delicious cocoa butter body butter, the recipe for which you will find here.
Step 3: Hydration
The final step was washing the mask off and applying some toner and moisturizer.
I felt and smelt pretty good for the rest of the day 🙂
Today, I am going to be writing about food without writing about food. “How”, you ask, “is this possible?” Read on my aspiring domestic goddesses and gods and you will see!
In a previous post (a recipe for chocolate brazil-nut butter), I raved about The Body Shop’s brazil-nut body butter. While this is my favourite flavour, a close second, is their cocoa butter body butter. Despite how much I love this product though, the truth is that I’ve always wanted a body-butter that was even more, well cocoa-ey. (By now, if you’ve been reading one or two of my blog-posts, you know that I am definitely not a “less is more” type of person; more is definitely better in my book!) In the past, I’ve made my own body and face oils, having been inspired and coached by an old friend of mine, Ralph, who now practices naturopathy and Ayurveda in South Germany. So the concept of making my own skin-products isn’t entirely new to me; I’ve just never gotten around to it.
Then, in December last year, before I pushed off to India for the holidays, I had friends over for dinner, and one of them mentioned making her own lip balm. This got me thinking, and I resolved to make my own body butter someday. And then, I promptly tucked away said resolve somewhere in the back of my mind and forgot all about it. What with packing, flying to India and having wildly inappropriate dance parties with my insane family (and by this I mean my parents, Aunts, and Uncles happily prancing about to bollywood dance music with us young’un’s), I just didn’t have the chance to give it a go.
And then today, I woke up with a rather inexplicable craving for homemade body butter. It may have something to do with an email I got yesterday from The Body Shop asking me to “Indulge in Chocomania: it’s Sinfully Good and Totally Guilt Free”. Guilt free? Really? Not when I am spending what is literally my entire week’s entertainment budget on lotions and potions that smell like the food I would be buying if I had any money left!
So I went out exploring in my neighborhood and bought some pure shea butter and cocoa butter. And then, I made my own, deliciously decadent body butter and I am not exaggerating in the least when I say that the smell, texture, and look of it had me giggling, smiling and babbling excitedly.
The first whiff of it was absolute, pure delight. Try it and you’ll see what I mean!
Equipment:
A double boiler or a microwave
Hand-held mixer or whisk
One medium bowl and one large, deep bowl
Jars to put the body butter in
Ingredients:
(All the ingredients I used were organic)
100 ml pure Cocoa butter
50 ml pure Shea butter
2 tbsp Vitamin E oil (at least 2000o IU)
3 tbsp Sweet Almond Oil
1/4 to 1/2 tsp Vanilla Essence or Vanilla Oil
1 Tbsp Mineral Water
Method:
You can buy cocoa butter in the form of “chips”, or in a jar. If you buy it in a jar, you might have to place the jar in warm water for a bit, just to soften it up a bit, before you take it out. I placed both the shea butter and cocoa butter jars in a bowl of warm water in the sink for about 5 minutes.
Now measure out the cocoa butter and shea butter into the medium bowl and place it in the microwave. I would heat it on a very low setting (time defrost) for about 20 seconds at a time, checking on it periodically. You want the butters all melted and looking like this:
It’s important to do this carefully as you don’t want to overheat the butters. Once the butter-mixture is nice and melted, stir it a bit and place it in the freezer for 5 minutes to cool down. Then, add the sweet almond oil and vitamin e oil, stir and put the mixture back in the freezer for another 5 minutes or so, until the mixture has firmed up. Once firm, take it out, add a tablespoon of water and using the hand held mixer or whisk, beat the mixture.
At this stage in the process, I was taking in the wonderful smell when I realized the only thing that would make this smell better would be vanilla essense. Since I bake a lot, I had some lying about, and so I added 1/4 tsp to the mixture and whipped it up into a wonderful, light, creamy and delicious smelling mixture 🙂 When I smelt it, I felt it needed some more vanilla, so I added another quarter teaspoon. On a side-note, I would have used vanilla oil if I had some around because vanilla extract has alcohol (which dries the skin). However, if you don’t have any lying about, I am sure the essence is fine, since you’re using such a small quantity of it.
When you feel it’s suitably fluffy and you’re happy with the texture, scoop the mixture into clean, dry jars!
And there it is, your very own, delicious body butter that will have you smelling like something you want to eat. I am not sure why I want to smell like something I’d eat, I just do! It makes me wildly happy and if this sounds like the sort of thing that makes YOU cheerful, go ahead and give it a go- it’s easy!