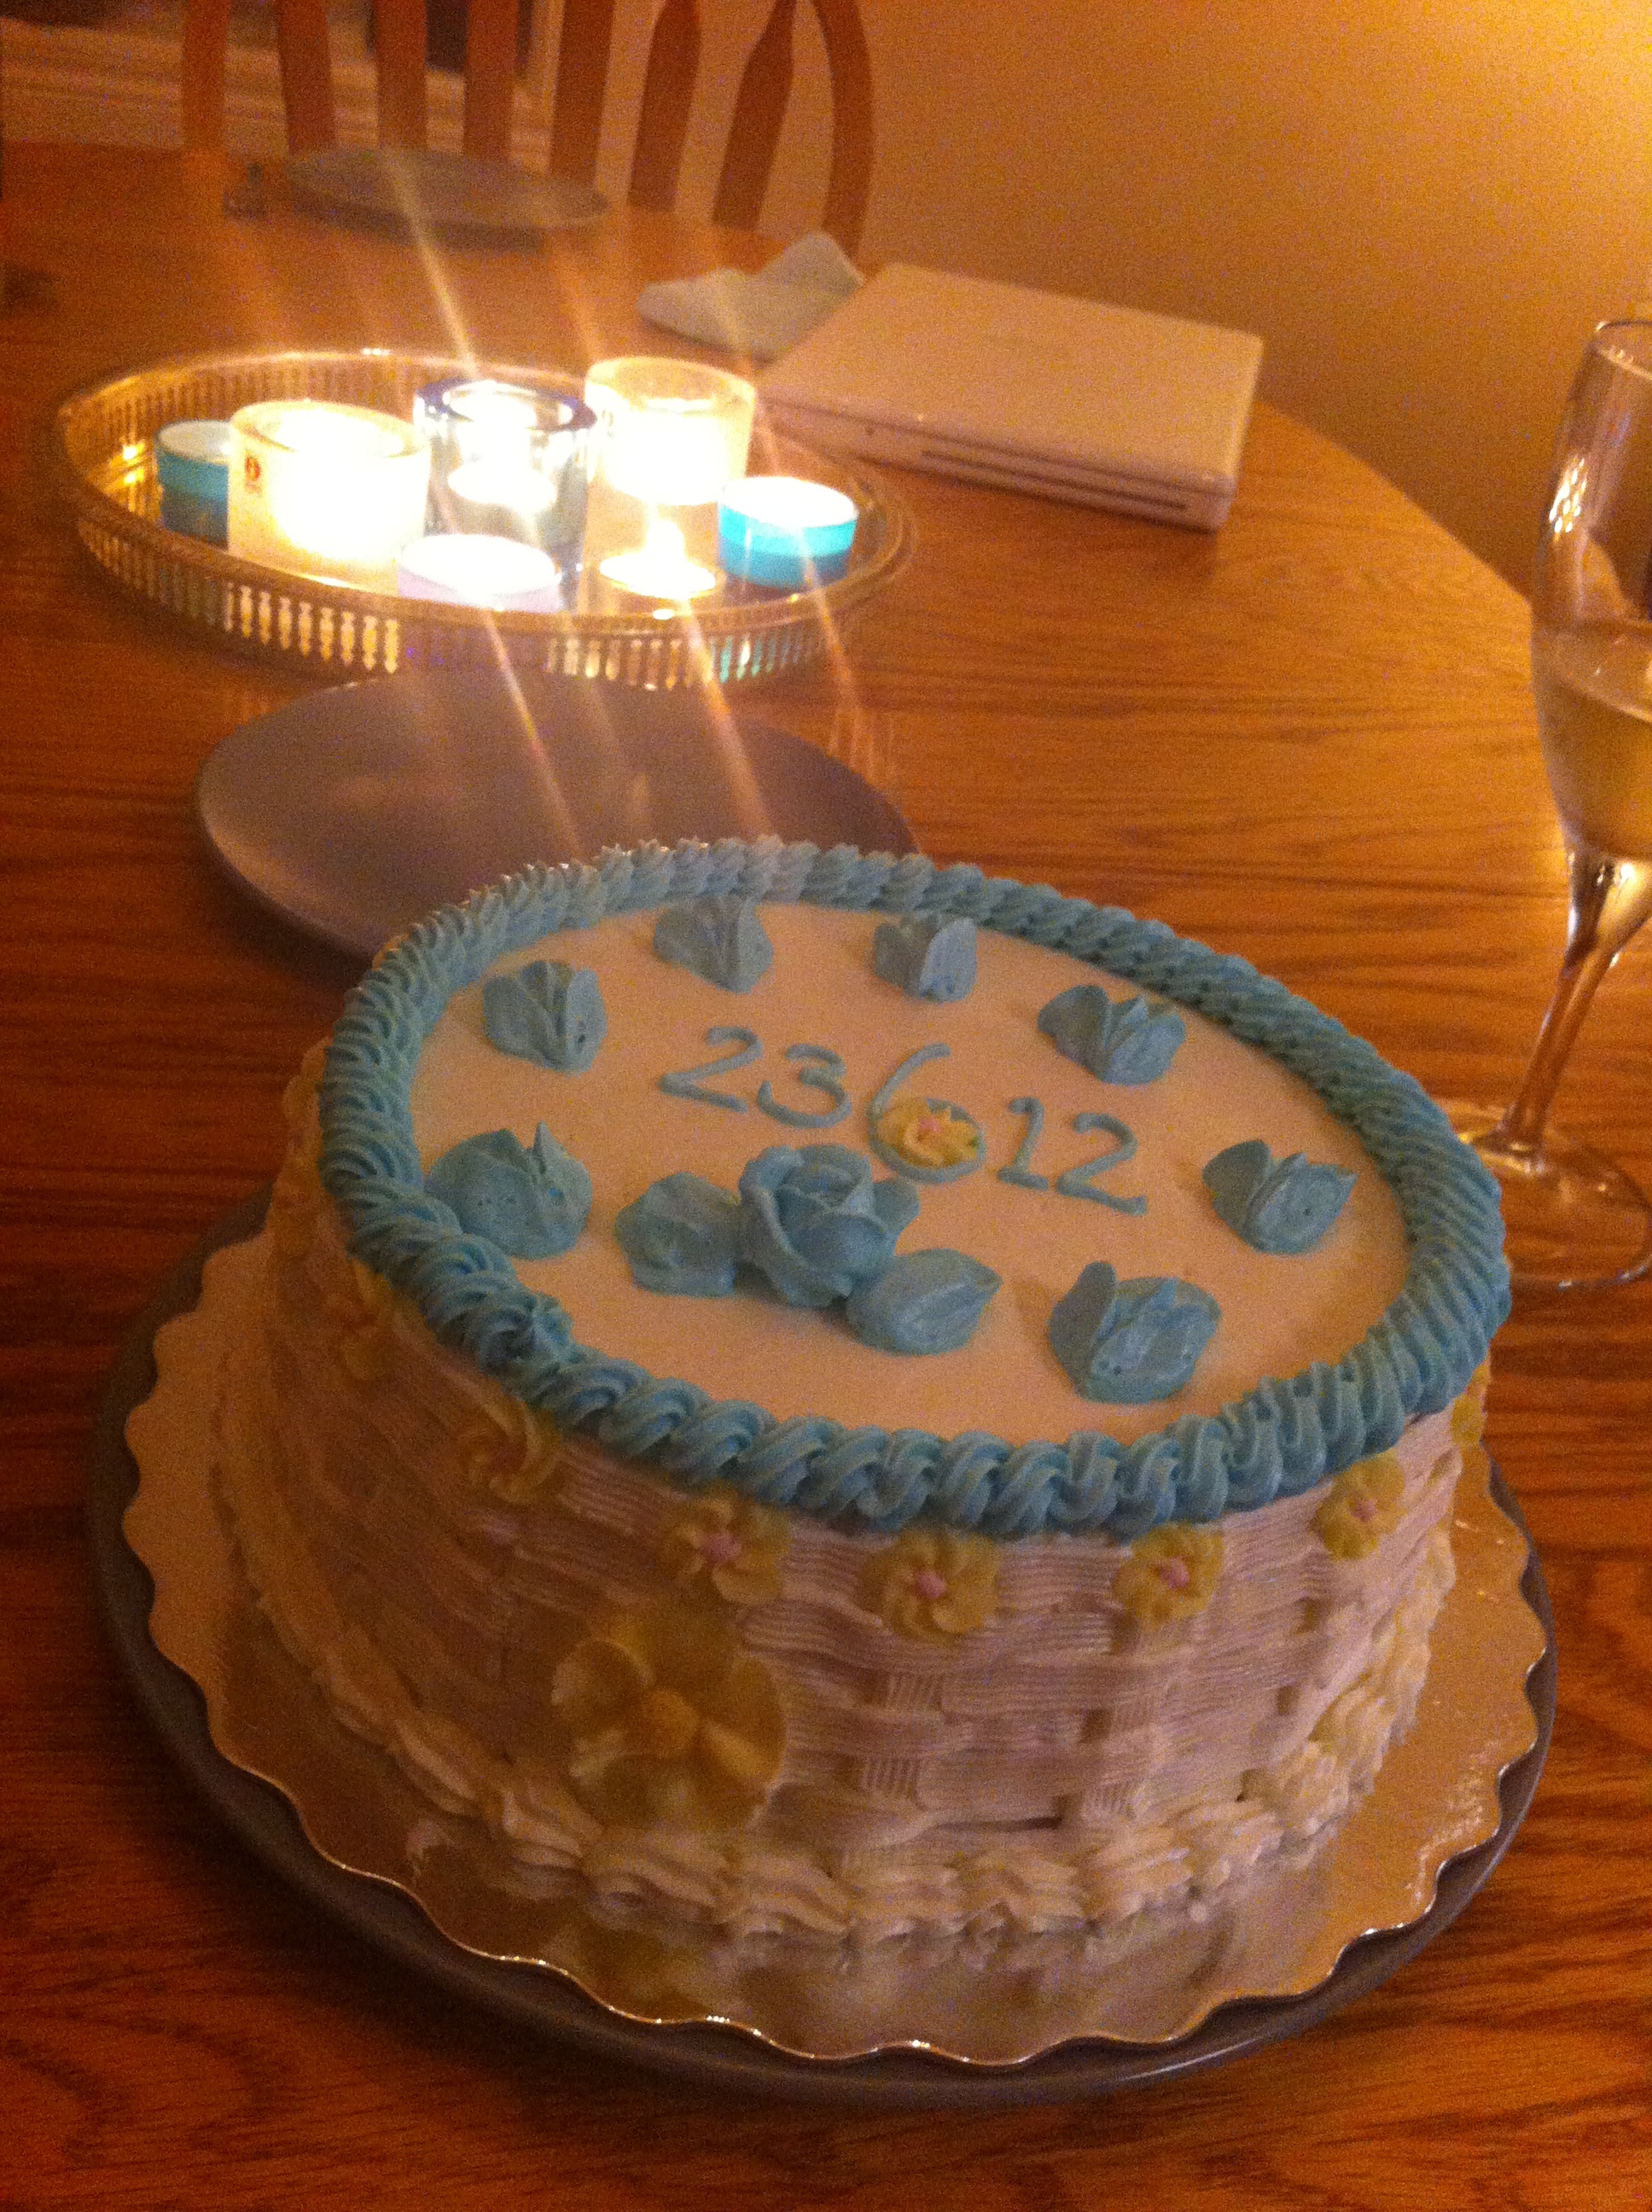
Last week, two old friends invited me over to their home for dinner. It was a lovely evening which ended with them bringing out this super pretty cake. On a side-note, the friend who baked this cake is so serious about baking that she is actually taking a cake-decoration class! Don’t you think it’s very intricately decorated?
It looked so ornate and perfect that I almost couldn’t eat it. Almost. Needless to say, I ate more than I should, and brought a whole lot more home with me 😛
I think ALL evenings should end like this, with a beautiful, and perhaps as importantly, large cake, being shared amongst a few good friends 🙂
Last week I was to meet an old friend for dinner. He said I could pick the restaurant and because I really wanted to try some place new, I spent hours researching restaurants in Toronto. I wanted to find a great place that served something unusual, something that was relatively new to me.
You see, I’ve been feeling more than a little restless lately; these past few months, I haven’t been traveling as much as I usually. One great way I’ve found to satisfy my wanderlust when I cannot afford to spend time traveling, is to try out a restaurant that serves food from some interesting part of the world. This ‘coping mechanism’ is particularly effective if the restaurant serves cuisine from a part of the world that I haven’t visited yet.
So I googled and yelped away and finally decided on a Persian restaurant called The Pomegranate. It is, oddly enough, situated in Little Italy. I rang the restaurant the next day and managed to get a dinner reservation for the same night.
The restaurant itself was cozy and the decor was somewhat cute. I have to be honest though, it wasn’t anywhere as nice as the review on blogto.com led me to believe. Some of the furnishings and fixtures were bordering on shabby and it wasn’t half as gorgeous or interesting as I expected it to be, given its Persian association. It reminded me a little bit of the scores of Indian restaurants I’ve seen, with kitschy Indian decor; in short it looked like it was trying far too hard to be what it thought westerners wanted it to be.
When the food arrived though, I forgot all about the decor. It was delicious! I should point out in no uncertain terms here, that I have never been to Iran, nor have I ever had ‘persian’ or Iranian food anywhere except in India. Also, I use the term ‘Persian’ to describe the food and the restaurant because this is how the restaurant owners have chosen to describe the place and the food. The term is fraught with political, cultural and historical connotations and tensions, but this post isn’t the place to go into all of this, and I am certainly not informed enough on the issues involved to wax eloquent on it, so I have decided to simply stick with the term that the restaurant owners have chosen.
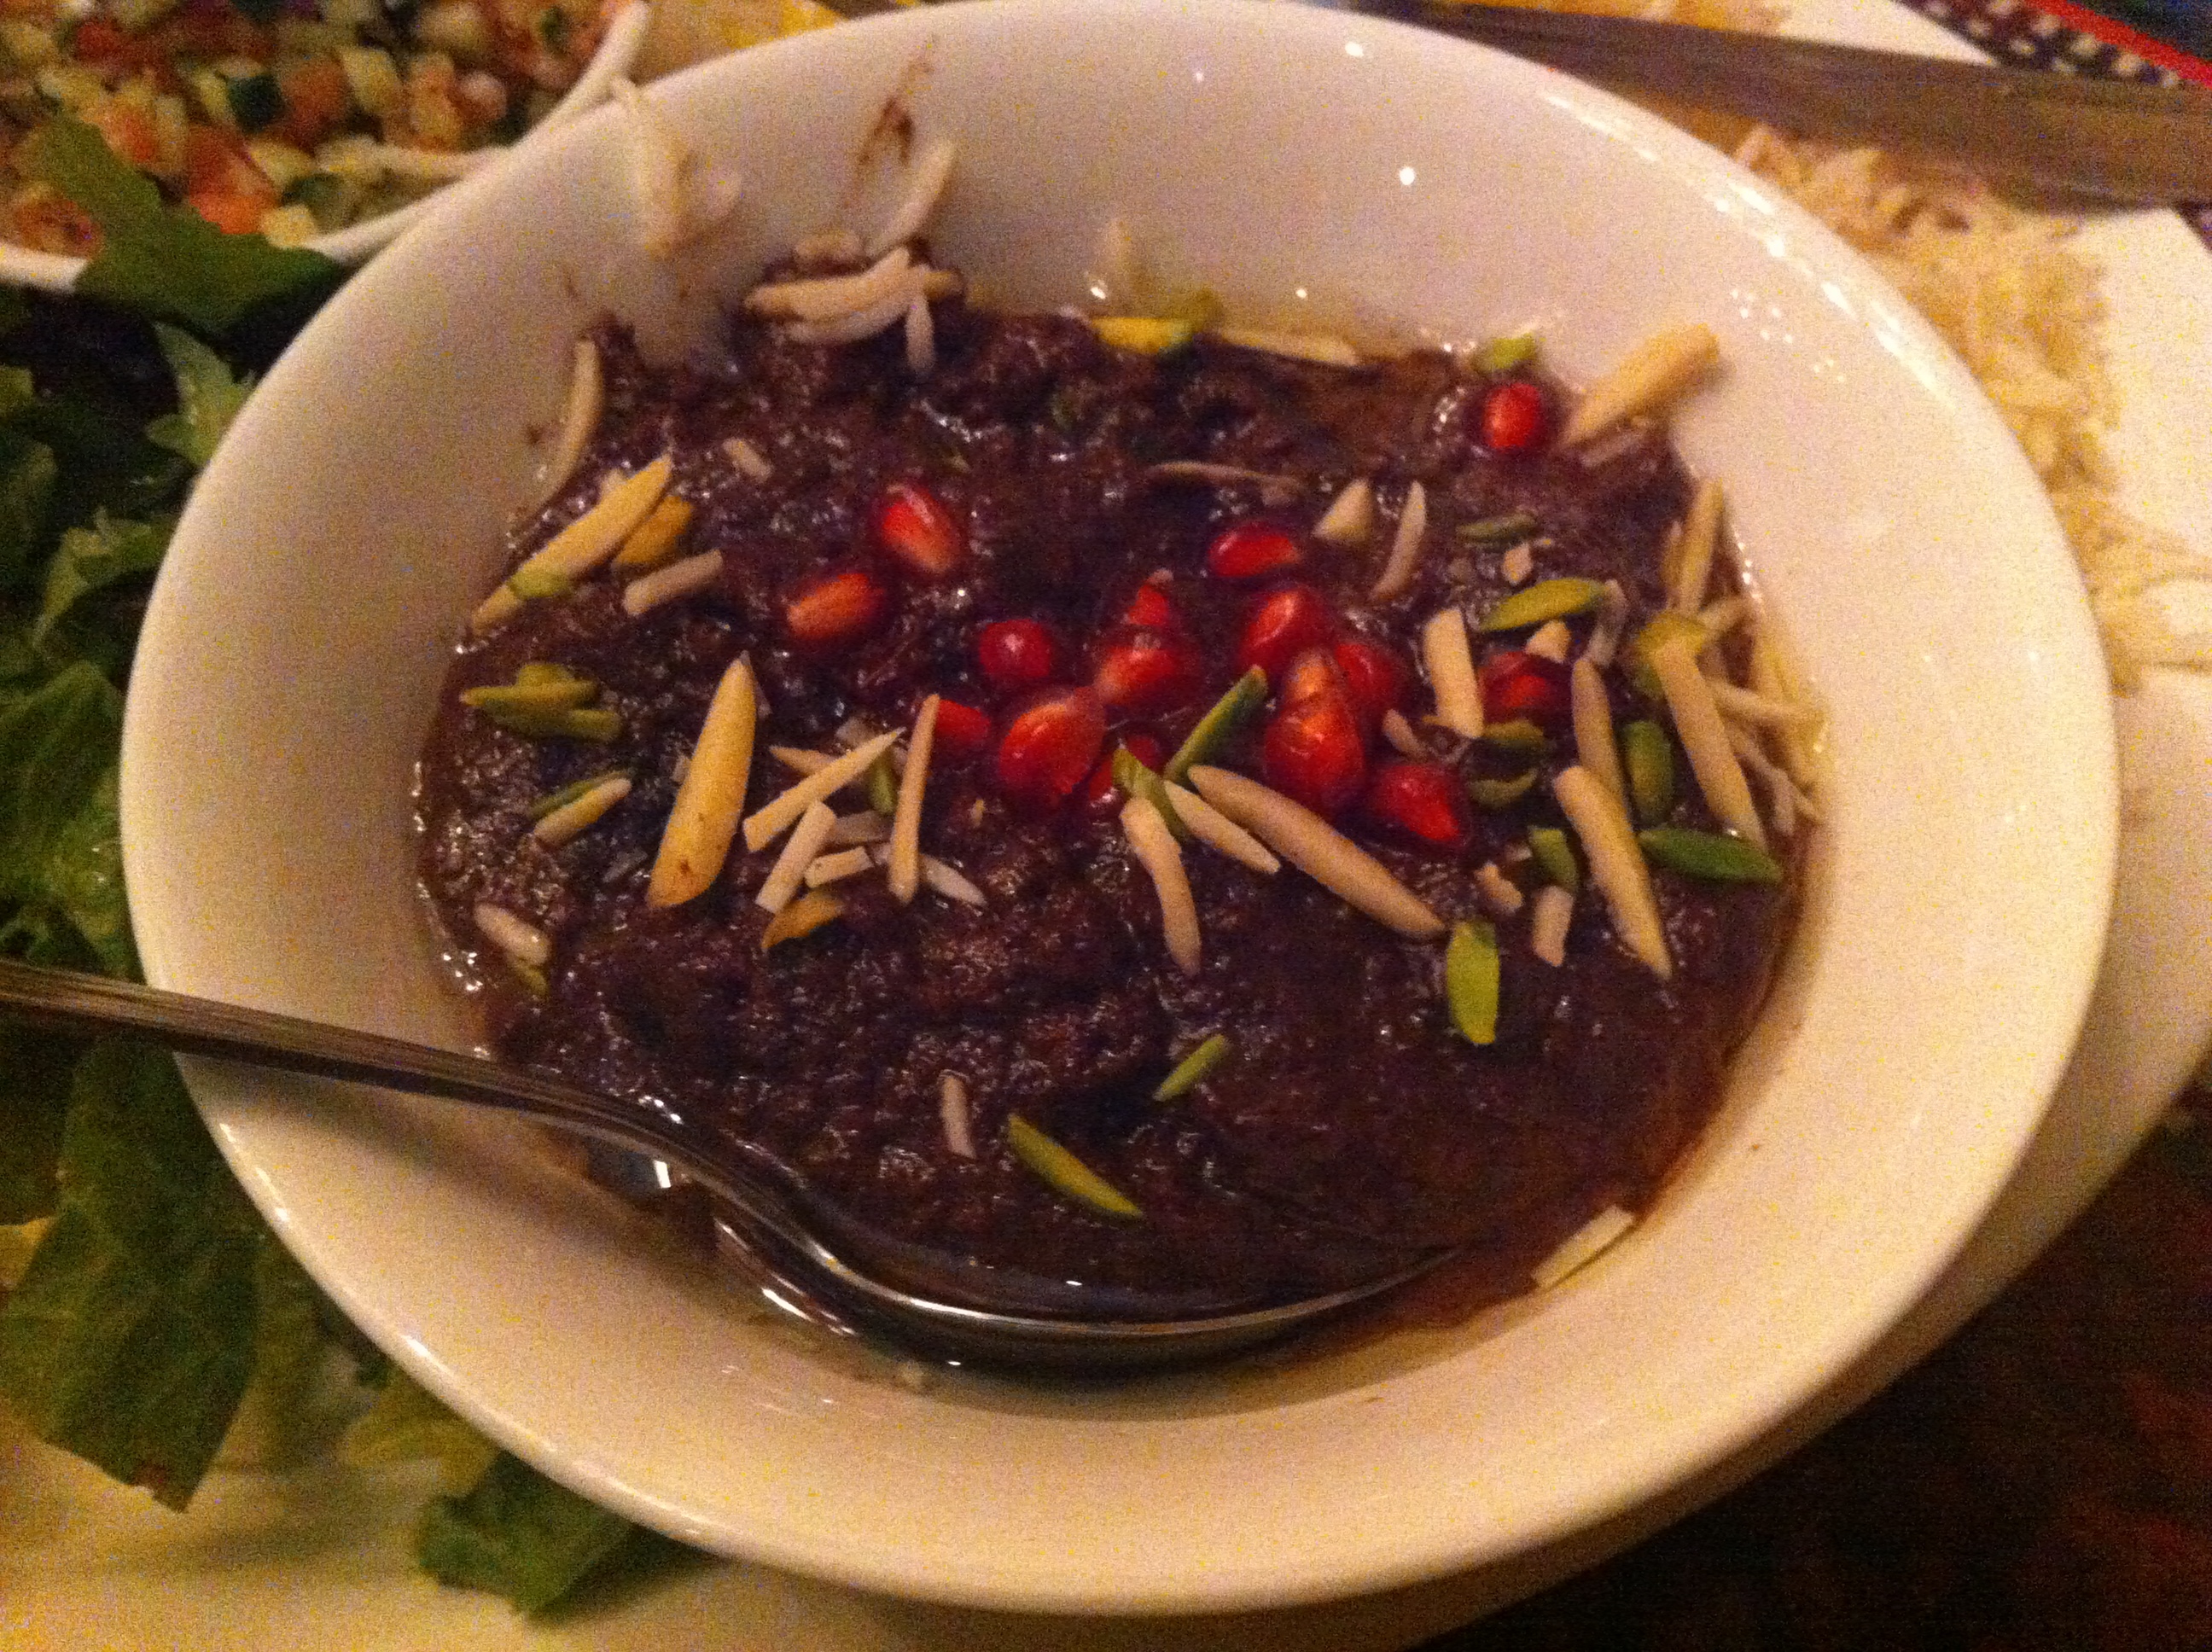
Getting back to the food, I had the fesenjaan (they had a vegetarian version with mushrooms). It came with a generous serving of rice and salad (of course I didn’t touch the salad 😉 )
Described as a stew of walnuts and pomegranate syrup, the fesenjaan was flavouful and creamy with a detectable but subdued nutty flavour. One of the reviews of the restaurant I came across described this dish as syrupy (and the menu hinted at this by describing it as a stew of pomegranate syrup) and I must admit I almost didn’t order it because of this, but in fact it wasn’t syrupy. It was delicately sweet and in terms of texture and consistency resembled a typical mughlai sauce/gravy (which of course entirely makes sense as mughlai food was deeply influenced by Persian cuisine). So it was more like a sweetened shahi paneer or butter chicken than it was like a syrup.
In conclusion, I recommend the place. It’s cute, the servers are friendly, the food is good and the decor is pleasant and cosy enough- it’s just not breathtaking or as unique as it could be.
This post is also about truffles. I thought I should just make that clear right at the start. If you’re tired of all my truffle-y posts, skip this one; my next one won’t be about truffles, or even chocolate. It’ll probably be about this delicious, spicy Hyderabadi-style fish I made yesterday; or it might be about a nice little Persian restaurant that I visited last week. Either way, it probably won’t be about chocolate.
Although, it just occurred to me that if you’re bored by chocolatey posts, you’re not really my key demographic, are you? (Really, what are you doing here if chocolate doesn’t make you ever-so-slightly unhinged?)
Anyway, this is a post about a great gift-idea: assorted chocolate truffles. This is usually an ideal little present because truffles are delicious (to most people), make people happy (quite literally (read my previous post for more on this)) and they’re very personal (you can custom-make flavours to suit your friends’ tastes). They’re also pretty easy to make, once you’ve gotten the hang of it.
The first step involves choosing flavours. You could choose from so many different kinds! Here are a few:
1. Dark Chocolate truffles (go here for my recipe)
2. Cointreau Dark Chocolate truffles (go here for my recipe)
3. Dark Chocolate Cream Cheese Truffles with Cream Cheese Centers (go here for my recipe)
4. Dark Chocolate Truffles with Orange-Cream Cheese Centers (go here for my recipe)
5. Dark Chocolate Truffles with Strawberry Cream Cheese Centers (go here for my recipe)
6. Dark Chocolate Hazelnut Truffles (recipe in this post)
7. Mint Chocolate Truffles (recipe in this post)
8. Dark Chocolate Truffles with Brazil-nut butter centers (recipe forthcoming)
I could go on and on, but I’ve got my whole life to invent truffle recipes. For now, I am going to stop thinking about truffle flavours and get on with this post.
Here’s what I chose for my first truffle-gift-experiment: Cointreau chocolate, mint chocolate and hazelnut. I chose these flavours because they’re really easy to make, easier than truffles with flavoured centers.
What you will need:
200g dark chocolate (At least 70% cocoa solids)
1 cup heavy/whipping cream
Two pinches of salt
About a teaspoon of mint essence
2 teaspoons Frangelico (or some other hazelnut liqueur)
1 teaspoon Cointreau or Grand Marnier
A handful of hazelnuts
2 tablespoons of cocoa powder
50g chocolate to dip the mint truffles in
3 sheets of parchment paper or foil
3 post-its
Coloured paper cups to place the truffles in
Method:
Chop up the chocolate with a knife and place it in a bowl:
You could also use a food processor. Next, warm up the cream until it just begins to boil and pour it over the chocolate:
Try and make sure that all the chocolate is covered. Let the bowl stand for a few minutes. Add the salt, take a whisk and gently mix the cream and chocolate. Now your ganache is ready.
Bring out two more bowls. Spoon about one-third of the ganache into one of these bowls and another third of the ganache into the other bowl. Now you have three portions of ganache in three separate bowls.
Mix in the mint essence in the first bowl, Frangelico in the second bowl and Cointreau (or Grand Marnier) in the third bowl. I would start by adding a little of each flavour and then adding more to taste. It is especially important to use the mint essence sparingly. For one thing, different brands of mint essence have varying levels of strength. Also, mint as a flavour very easily overpowers chocolate.
Let the ganache(s) cool to room temperature and then, place the bowls in the fridge.
In about an hour, check if the ganache has firmed up. If it has, take all three bowls out of the fridge. Place three sheets of foil or parchment paper on three separate plates. Take three post-its and write the names of the flavours of the truffles down, one flavour for each post-it. Now, stick a post-it underneath each plate. Next, scoop out tablespoon-sized portions of the mint flavoured ganache on the correspondingly labelled plate. Use an ice-cream scoop if you have one.
Repeat this with the other two flavoured ganaches. Place the plates in the fridge.
After about 20 minutes, take the plates out and begin to roll each scoop of ganache into as perfect a sphere as possible. Make sure not to confuse the different flavoured truffles; place all mint truffles on the plate labelled ‘mint’ and the Cointreau ones on the plate labelled ‘Cointreau’ and so on.
Once you’ve rolled all the ganache into balls, place all three plates back in the fridge for about 20 minutes.
Now comes the last step, coating the truffles.
For the hazelnuts truffles, I decided that the most appropriate coating was toasted and crushed hazelnuts. This is a simple enough coating to make. Just pop a handful of hazelnuts in the oven (preheated to 375 farenheit (that’s 180 celsius)) for about 10 minutes, tossing the nuts once during this time. Let them cool and then place them in a tea-towel and rub them against each other until they lose their skins. Then place them in a mortar and pestle and coarsely grind them. I suggested a mortar and pestle rather than a grinder because this way you can make sure you break up all the nuts without reducing most of the nuts to a powder.
Coarsely ground toasted hazelnutsAnd now for the final touch, just roll each hazelnut truffle about in your hand for a bit to make the outside of the truffle sticky and then roll it in the crushed hazelnuts. Lightly press the nuts in to make sure they stick to the truffle.
For the Cointreau truffles, I decided on a simple coating: cocoa powder. Just take a few tablespoons of cocoa powder in a bowl, warm the outside of each Cointreau truffle by rolling it about in your hand, and then lightly roll it in the bowl of cocoa until it is completely covered.
Lastly, I decided to dip the mint truffles in dark chocolate. This looks and sounds more difficult than it is, and it’s actually a lot of fun 🙂 It is also undoubtedly messy.
Carefully melt 50g dark chocolate (using either a double boiler or a microwave on a very low heat setting). Let the chocolate cool a bit (we don’t want to wait for it to harden, but we don’t want it to be too warm either).
Once the chocolate has cooled somewhat, take a truffle and dip it into the chocolate. Roll it about in the chocolate until it’s completely coated and then fish it out.
Place the truffle back on the foil/butter paper. Repeat this process with all the truffles. Once you’ve dipped all the truffles, take a toothpick and trace a circle around the bottom of each truffle. This is so that we don’t have a lot of excess chocolate stuck awkwardly to the bottom of the truffle once the outside chocolate has hardened.
Place each truffle in a paper cup. Preferably, use paper cups of different colours that compliment the truffle flavours. For instance, I used green for mint, orange for Cointreau and light brown for hazelnut. Let the truffles sit somewhere cool to cool. They should be ready in 20-30 minutes.
Since the idea was to make assorted truffles as a gift, I wanted to pack them in a nice box. I hunted all over my neighborhood for a cute gift box, but couldn’t find anything appropriate. I finally stumbled upon an arts and crafts store, and they were nice enough to cut some beautiful coloured paper for me so that I could make little bags out fo it:
I placed the truffles in these bags once they were ready and sowed on little message cards on the front that not only gave my friend my regards, but also described the different flavours of truffles included in the bag on the back.
Needless to say, my friend won’t mind taking care of my plants again 😉
I wouldn’t say that I am tremendously fond of macaroons. I mean I like them, sure, but I’ve never woken up in the middle of the night and wanted one. I have woken up in the middle of the night craving all sorts of other foods. Some of the things I have had midnight cravings for include:
1. Chocolate
2. Chocolate Ice Cream with Fudge on Top
3. Chocolate Fudge
4. Fish Tacos
5. Re-fried Beans
6. Yummy Thin Crust Pizza
7. Fish Curry (and this is an umbrella term I am using to refer to about 6 kinds of fish curry)
I could literally go on for hours, and this is just what I craved over the last week or ten days.
But, I’ve never ever craved a macaroon. My point is, I was never into macaroons, that is until recently. The other day, a friend brought me some assorted macaroons as a gift and since then, I’ve developed a taste for them. It isn’t that I’ve never had them before, it’s that these were particularly delicious macaroons. Unlike chocolate, which I enjoy eating even when it’s of average quality, I only like macaroons if they’re particularly well made, and these were yummy! They were from MoRoCo, a little chocolate-themed store and restaurant in the Yorkville area of Toronto. Go here for their website.
The macaroons were light and airy and I loved all the different flavours they had.
They made the most delightful little snack last evening along with a ginger-white chocolate cookie. You see, I set them on my bedside table late in the afternoon, and my plan was to take a break from working to eat them, when I was done reading this important chapter of an important book for my even more important dissertation.
It turned out to be a rather engaging chapter, and I kept on reading. Evening had turned to dusk before I realized I hadn’t eaten them yet. (This, by the way, is proof of the fact that I am only reasonably fond of macaroons, whereas I am unreasonably obsessed with chocolate. I’ve never left uneaten chocolate by my bedside and forgotten about it. That’s unheard of! If I did that and it became known to my family and/or friends, everyone who loved me would be very worried about me indeed.)
I needed a drink at this point, so I made myself a colourful drink (fresh, pulpy watermelon juice) to go with the snack:
Needless to say, I had a nice, rewarding study break. I did of course also dig into some of those truffles I made yesterday as well 🙂
Yesterday, the weather was lovely. Although the sky was cloudy and the sun managed to peek out only once or twice, the air was warm and breezy. In the evening, after a grueling Pilates class, I went out for a little stroll in the neighborhood. As I was walking past a green-grocers, it occurred to me that I ought to be healthy and buy some fruit. “I could make myself a healthy fruit shake”, I thought to myself. Going to yoga or Pilates sometimes does this to me; it inspires me to be uncharacteristically open-minded about eating healthy fruit. (It has yet to have any effect on my general aversion to veggies though; THAT would be a real miracle!)
There were several pretty, colourful and bright fruit in the store, but a little basket of strawberries drew my attention the most, and so I bought it. On the walk home, my mind did what it usually does, it wandered to chocolate. “What about strawberry chocolate truffles?” I thought to myself. “Or wait! What about strawberry cream-cheese centered chocolate truffles” I asked myself. Ooooh that sounded delicious, wonderful, so good in fact, that I set about executing my devious plan right then and there. I rushed over to the yucky supermarket across the street from my apartment and bought some cream-cheese. Three hours later, I ended up with this (I took a bite out of it so I could show you the delicious creamy center:
Dark Chocolate Truffles with Strawberry Cream Cheese CentersAnd here I am chronicling my adventure.
Since my last cream-cheese truffles (brown sugar-coated truffles with orange cream centers) came out so well, I decided to follow a similar process for today’s project. I began with a traditional dark chocolate ganache (made with cream) which I used to make the truffles themselves. Next, I incorporated the cream cheese and strawberry flavours I love so much into the recipe by making cream cheese centers for the truffles. This is the one fairly tricky part of the process. Actually shaping the truffles with the cream cheese centers can be messy and it requires patience. Finally, instead of coating the truffles in brown sugar (as I did with my last batch) I dipped the truffles in dark chocolate. They were pretty good, and if you like strawberries, you will like these EVEN more, so give them a try, why don’t you?
Ingredients for the Truffles:
100 g dark chocolate (since the strawberry cream cheese filling was a little sweet, I used chocolate with 85% cocoa solids)
Chop up the chocolate into small pieces (you could also process it in a food processor) and place it in a bowl. It’s important to chop up the chocolate into little bits so that it melts evenly when you pour the cream over it. It should look like this:
Chopped up chocolate to make a ganacheHeat the cream in a pan until it just begins to bubble and then pour it over the chocolate:
Let the mixture stand for a few minutes. Then very gently mix the chocolate and cream:
Add the vanilla and salt and mix until you have a smooth ganache:
Cover the bowl and let the ganache cool to room temperature, then place it in the fridge.
While the ganache is chilling, let’s make the cream cheese filling. The first step is making some strawberry juice. Wash the strawberries thoroughly and then hull them (for instructions on how to do this, go here). This is what they should look like:
Hulled StrawberriesChop up the hulled strawberries and then process them in a food processor or mixer:
Isn’t this a beautiful rich colour?
Strain this pulp to get strawberry juice. We’ll be using this to flavour the cream cheese.
Set the juice aside. Take another bowl, put the cream cheese in it, and whip it up with a mixer, until it’s smooth.
Softened cream cheeseNow, add two tablespoons of icing sugar and whip it all up.
Taste the mixture. If you think it needs more sugar add some more. When it tastes right, add strawberry juice to taste, one teaspoon at a time. You should add as much juice as you think tastes good, however, remember that the more juice you add the thinner the filling will become, and the thinner the filling, the more difficult it is to work with when shaping the truffles.
I had to add some more sugar at this stage to thicken it. It tasted good even with the sugar, but it was more than I would ordinarily have added. When the filling tastes just right to you, pour the cream cheese filling into an icing/frosting bag or a sandwich bag and put it in the fridge.
Once the ganache has been in the fridge for about an hour, take it out and see if it’s firmed up. It should be firm but not hard. Take a large plate and cover it with foil or butter paper. Portion out the ganache on the foil or butter paper, with each portion measuring about a tablespoon full.
Place the plate in the fridge. In about an hour, take it out along with the cream cheese filling. Now you’re ready to begin shaping the truffles.
Pick up a scoop of ganache and shape it into a ball. Flatten it on your hand like a mini-tortilla or chapathi. Next, squeeze a bit of cream cheese filling out of the frosting bag (if you were using a sandwich bag cut off one of the bottom tips of the bag) on the center of the ‘chocolate chapathi’:
Fold the chocolate over the cream cheese filling and roll the whole thing carefully into a ball. I don’t have a photograph of this because by this time my hands were covered in chocolate. Repeat this until all the ganache has been used up.
Almost Ready-Truffles!For the final step, carefully melt 50g dark chocolate (using either a double boiler or a microwave on a very low heat setting). Let the chocolate cool a bit (we don’t want to wait for it to harden, but we don’t want it to be too warm either).
Once the chocolate has cooled somewhat, take a truffle and dip it into the chocolate. Roll it about in the chocolate until it’s completely coated and then use a fork to fish it out. Place the truffle back on the foil/butter paper. Repeat this process with all the truffles. Once you’ve dipped all the truffles, take a toothpick and trace a circle around the bottom of each truffle. This is so that we don’t have a lot of excess chocolate stuck awkwardly to the bottom of the truffle once the outside chocolate has hardened. Place the truffles somewhere cool to cool. They should be ready to eat in 20-30 minutes. Serve in little paper cups. Enjoy!
This is my favourite kind of truffle so far. In fact, I can honestly say that I’ve never eaten a more delicious chocolate truffle. Mmmm.
It all started with me wandering into my kitchen last evening. I went through my fridge and cabinets, trying to think of a new combination of flavours that I’d never tried in a truffle before. All sorts of ingredients caught my attention, but my eyes kept returning to the block of cream cheese in my fridge. As I wrote in Sunday’s post about dark chocolate cream cheese truffles, I absolutely love the flavour of cream cheese. So I decided to stick with cream cheese, and see if I couldn’t come up with a slightly better version of Sunday’s recipe.
Sunday’s truffles were cream cheese truffles through and through; not only did they have cream cheese centers, the truffles themselves were made with cream cheese. While I liked Sunday’s truffles, what I found was that the texture of the truffle changes when you use cream cheese instead of heavy/whipping cream (this is what is used in traditional truffles); the texture isn’t as velvety and creamy. Generally speaking, this is an acceptable compromise to me because I love the flavour of cream cheese. But Sunday’s experiment taught me that if you’re willing to go to the extra trouble of making cream cheese centers, you don’t need to make this compromise at all! In fact, I thought that the cream cheese in the chocolate didn’t add much in terms of flavour, it was upstaged by the intense flavour of the dark chocolate and by the cream cheese in the center. I could reduce the amount of chocolate I added, but I wanted to make dark chocolate truffles, not milk chocolate ones.
Therefore, for today’s project, I decided to use a traditional dark chocolate ganache (made with cream) to make the truffles, and then incorporate the cream cheese flavour I love so much by making cream cheese centers for them. But that wasn’t all, I added a twist or two to the recipe. You see, I wanted to play around a little with the flavours in my kitchen; it would have been boring to simply recreate, with a small modification, Sundays recipe.
First, I wanted a citrus flavour to the cream cheese, so I added some orange liqueur (Cointreau). Second, I thought it might be fun to coat the truffles with something I’ve never tried before, large brown sugar crystals. But since they’re sweet, I decided to make the chocolate a bit bitter. So I replaced some of the dark chocolate in the ganache recipe with unsweetened chocolate. Here’s what I ended up with:
And boy am I glad I played instead of sticking to what I know. The truffles were just right in terms of texture and flavour! They were creamy and squishy and the cream cheese centers were gooey, soft, and a little orang-ey. To top it all, the sugar-coating was literally the sugar-coating, it balanced the bitterness of the chocolate perfectly. Here is a shot of half a truffle after I’d bitten into it. I think it illustrates the squishiness and softness I am talking about:
The flavours danced together on my tongue with just enough complexity to be intriguing; they acted in perfect concert, I had to close my eyes and savour it. I haven’t felt this excited since I discovered chocolate brazil nut butter.
If you’ve been sold by my mad ravings or these pictures, go ahead and give it a go! The only tough part of the process is actually shaping the truffles with the cream cheese centers. This can be a little messy and it requires patience.
Update: Another important thing to note is that the sugar-coating absorbs moisture. So the outside of the truffle can get wet and sticky over a day or two. The solution that I have found for this problem is to roll the truffles in brown-sugar right before (or even a few hours before) serving them.
Ingredients for the Truffles:
2.5 ounces dark chocolate (at least 70% cocoa solids)
1 ounce unsweetened chocolate
1/2 cup heavy/whipping cream
A small dollop of butter
A pinch of salt
Brown sugar to coat the truffles
Ingredients for the Cream Cheese Centers:
50 g cream cheese (at room temperature)
A dollop of butter
2-4 tablespoons of icing sugar
2-3 teaspoons of Cointreau or Grand Marnier
Method:
Chop up the chocolate into small pieces (you could also process it in a food processor) and place it in a bowl. It’s important to chop up the chocolate into little bits so that it melts evenly when you pour the cream over it. It should look like this:
Heat the cream in a pan until it just begins to bubble and then pour it over the chocolate:
Let the mixture stand for a few minutes. Then very gently mix the chocolate and cream:
Add the butter and salt and mix until you have a smooth ganache:
Cover the bowl and let the ganache cool to room temperature, then place it in the fridge.
While the ganache hardens, let’s make the cream cheese filling. Take another bowl, put the cream cheese in it and whip it up with a mixer, until it’s smooth.
Now add the butter, two tablespoons of icing sugar and a teaspoon of Cointreau and whip it all up.
Taste the mixture. If you think it needs more sugar or Cointreau add some more. When it tastes right, cover the bowl and put it in the fridge.
Once the ganache has been in the fridge for about an hour, take it out and see if it’s firmed up. It should be firm but not hard. If it’s firm take it out along with the cream cheese filling. You will also need a bowl with a few tablespoons of brown sugar in it and a large plate covered with foil or butter paper. Now you’re ready to begin shaping the truffles.
Portion out the ganache onto the foil or butter paper, with each portion measuring about a tablespoon. When you’ve scooped out the lot take the first portion and shape it into a ball. Then, flatten it on your hand like a mini-tortilla or chapathi:
Now scoop a bit of cream cheese filling onto the center of the ‘chocolate chapathi’:
Now fold the chocolate over the cream cheese.
Finally, roll the whole thing carefully into a ball. I don’t have a photograph of this because by this time my hands were covered in chocolate. Repeat this until all the ganache has been used up.
For the final step, start with one of the first few truffles you shaped. (When you work with the truffles they will get a little melted and squishy from your body heat. This is why i suggest picking up one of the first few truffles you worked on; by now it will have cooled down and firmed up again.) Gently roll it about in your hand to make the surface a little sticky. Roll the truffle in the bowl of brown sugar so that it is completely coated.
Repeat until all the truffles are coated. And there you’re all done! Enjoy your delicious truffles, I know I did 😉
I made some absolutely delicious truffles today, and I was all set to write a post about it. Then I looked at my blog home page and realized that my last post was also about truffles. (In fact, a LOT of my posts are about truffles.) Also, Easter was just the other day, so it occurred to me that some of you are probably feeling a little stuffed, maybe even a little ill from all the chocolate eating. In thinking about how guilty and sick you might be feeling, I began to feel somewhat stuffed myself. I’ve been eating loads of homemade, delicious but cheese covered pizza and of course, tonnes of chocolate. It was time, I decided, to eat something yummy but healthy. And so, I made myself the healthiest dinner that I am capable of eating. I have difficulty eating leafy vegetables you see, they literally make me feel unhappy and hopeless. But this particular magical recipe for spinach lentils that I am about to share with you is as spicy and flavourful, as it is good for you. I am no doctor or nutritionist, but I think you’ll all agree with me when you see the ingredient list.
Oh and as you can see from the title, this is a Hyderabadi recipe. Hyderabad is the capital of a southern State in India: Andhra Pradesh. It was the seat of the Nizams, who ruled Hyderabad for about 2 centuries. The word Nizam or Nizam-ul-mulk means ‘administrator of the realm’ or ‘governor of the nation’ in Urdu. This is because the first Nizam was originally appointed by the Mughal emperor to oversee and govern Southern India on his behalf. As the Mughal empire began to crumble (for a brief overview of Mughal history go here), Asaf Jha who was a Mughal noble and a Nizam, declared independence from the Mughals and founded his own dynasty, the Asaf Jha dynasty, also known as the Nizams.
The history of the Nizams is of course more complex than this little paragraph intimates. It is full of battles, intrigue and all the other stuff that good history is made of. But this post is about food, also I am not a historian. I just wanted to give you this brief little background so you can understand Hyderabadi cuisine better. I would recommend reading more about the Nizams though, about their food, jewellery and architecture in particular.
Because the Nizams were essentially nobles from the Mughal court, their food was strongly influenced by Mughlai cuisine. But South Indian food, more precisely Andhra food, i.e. the food the locals ate (and continue to eat today) before the Nizams came to Hyderabad, is also delicious and distinctive. Typical Andhra foods include: spicy peppery Rasam; Chappala Pulusu (fish curry); and Erra Avakaya. So it isn’t surprising that Hyderabadi food blends Andhra and Mughlai styles. Andhra food itself can be broken down into several different types based on different regions of the State. There are also hints of Arab, Turkish, Parsi and other influences in Hyderabadi food. So you see, it is bastardized, pluralistic, and historically rich.
It is also amongst the most delicious cuisines on earth. I kid you not. It’s as spicy as South Indian Andhra food, its magnificence equals Mughlai food (like dal Makhani), and it’s as rich and flavourful as Italian food can be.
(And while I am not appointing myself final arbiter of the best food known to man, I think a woman who has a blog (mostly) about food, a woman who goes into raptures about food, a woman whose very mental stability depends on the availability of a delicious meal, in short a food-crazed woman, should be taken very seriously.)
Anyway, now that you’re sold on its deliciousness, here it is, a spicy palak dal- Hyderabadi style:
Ingredients:
1 cup of moong dal (a type of lentil, native to India)
1/2 teaspoon haldi/pasupu/turmeric powder
1/2 teaspoon grated ginger
1/2 teaspoon crushed garlic
About a medium sized bunch of spinach
1/2 tablespoon dried mango powder (Amchur)
5-6 green chilies cut in half lengthwise
2-3 sprigs of coriander/cilantro
Salt to taste
(The following are the ingredients for the tadka baghar or popu)
1 teaspoon cumin seeds
1/2 teaspoon mustard seeds
5 dried red chilies
5-6 fresh curry leaves or about 10 dried ones
4 peeled whole garlic cloves
2-3 tablespoons of ghee (you can get ghee at an Indian store; if you want to make south Indian ghee, you can read my recipe here)
Method:
The first thing to do is to prepare the dal (lentils). I use moong dal for this recipe. You should be able to get these lentils at an Indian store, if you don’t live in India. I normally soak lentils for about 20 minutes before I cook them. If you don’t have the time to do this, you can skip this step. This is how the lentils look soaked:
The easiest way to cook dal is to cook it in a pressure cooker. If you don’t have one, just boil the dal in water until its cooked. Add half a teaspoon of turmeric and some salt to the dal before you cook it. Once it’s cooked it should look like this: Next, heat one tablespoon of oil in a saucepan. When it’s hot add the ginger and garlic. Fry the ginger and garlic until cooked (slightly browned, but not burnt). Add the spinach to the ginger-garlic and let it cook, stirring occasionally. Once the spinach is tender, add the lentils.
Let this cook for about 10 minutes. Then add half a tablespoon of dried Mango powder (Amchur), the green chillies and the coriander sprigs to the pot and again, let the dal cook. After about 5 minutes we’re ready to add the tadka or baghar (tempering of spices in oil).
The baghar:
Heat a tablespoon or two of ghee in a little saucepan like this:
Let the ghee get hot. To test if it’s hot enough, throw a single cumin seed into the pan. If it begins to sizzle, add the rest of the cumin along with the mustard seeds and stir them about until they start to pop. When they start to pop, add the curry leaves, garlic cloves and red chilies.
Once the red chillies darken like this:
Add the baghar to the lentils.
and immediately cover the pot.
The dal is now ready! Serve it with some hot rice, yoghurt and a papad.
This afternoon I was out grocery shopping and I saw a box of truffles in the chocolate section that caught my eye- they were ‘cheesecake truffles’. “Hmm that sounds delicious” I thought to myself. The thing is, and you may not know this about me, as much as I am a chocolate-lover, even a chocolate-addict, I am so much more when it comes to cheesecake, I am in fact, a chocolate-cheesecake-fiend.
Don’t believe me? Well it’s true and the following tale will prove it to you. You see, there is a coffee shop quite literally below my apartment and they have delicious chocolate-almond cheesecake. This time last year, I was eating one slice of cheesecake per day. Soon, things got so bad that the owner of the coffee shop, his wife and two employees of theirs, independently of each other, expressed genuine surprise bordering on concern, when they noticed how often I was running downstairs for cake. When your cheesecake supplier stages an almost-intervention, well you know things have gone too far, so I quit cold turkey.
But of course, I still have a soft spot for the cheesecake-chocolate combination. So when I saw the box of cheesecake truffles, I rushed home like a woman possessed and researched recipes. It turns out one has to first bake a cheesecake, then let it firm up in the fridge for several hours and only then can one use this hardened cheesecake as a filling in truffles. This seemed like far too much waiting, so I decided to make chocolate cream cheese truffles, which are close enough.
The process was fairly easy, and what I really liked about it was that one could add sugar and chocolate to taste. Traditional chocolate truffles are made from a ganache (you can read more about this in my previous posts about basic dark chocolate truffles and Cointreau truffles), and you can’t really add more or less chocolate, with intermittent tastings while making ganache (to be accurate, you probably could, but I think it would be a complicated process and you’d run the risk of breaking the ganache). So this really is something unique about this cream cheese truffle recipe. I’d recommend giving it a go, you might get hooked 😉
Ingredients:
100 g dark chocolate (at least 70% cocoa solids) (the better this chocolate is, the better your truffles will taste)
150 g cream cheese
5-6 tablespoons of icing sugar
1/2 tablespoon butter
1/2 teaspoon vanilla essence
Some cocoa powder or a handful of hazelnuts toasted and ground
Equipment:
4 Bowls and several spoons
1 large plate
A hand-held or stand-alone egg-beater/mixer
1 sheet of foil or butter paper
Method:
I began by placing the cream cheese (at room temperature) in a bowl.
Next, I melted the chocolate in the microwave. (When you do this, be sure to do this on a low setting as you don’t want to burn the chocolate. Ideally, you should melt the chocolate in a double boiler to avoid this, but I find that if I am careful, I can do it in the microwave.
While the chocolate was melting I began whipping the cream cheese up with the mixer (egg-beater). When it was creamy and softened, I added 2 tablespoons of icing sugar and whipped this into the cheese. I tasted the mixture and thought it needed a little more sugar, so I added another 2 tablespoons. (You should also taste the mixture intermittently and see if it needs more sugar; add as much as you think is appropriate.) Once it tasted just right, I scooped out about a third of the mixture into another bowl and place this bowl in the fridge.
To the rest of the cream cheese mixture (the 2/3rd remaining in the first bowl) I added the vanilla essence, butter and about three-quarters of the chocolate and mixed it all up with a spoon (don’t whip this). Then I took a little taste. It tasted like it needed more chocolate, so I added some more.
I repeated this until I was satisfied that it tasted just right.
Now I was ready to start shaping the truffles. When you’re trying this, make sure you have enough works-space on your kitchen counter. I like sitting down while I do this, because it takes some time, so I usually move over to the floor because I feel more comfortable sitting cross-legged. You could move over to the dining table if you prefer. So I set the cream cheese mixture and the chocolate cream cheese mixture side by side on the floor.
I also placed a sheet of butter paper on a large plate next to these bowls.
Now I was ready for the fun part! I scooped out some of the chocolate mixture and shaped it into a sphere in my hand. Then I flattened it out on my hand like a mini chapathi or tortilla.
Then, I scooped out a bit of the plain cream cheese mixture on to the centre of the ‘chocolate chapathi’:
and carefully rolled the chocolate layer over the cream cheese centre, shaping the truffle into as perfect a sphere as possible. (I don’t have a photograph of the sphere-shaping bit because I needed both hands and by this time my other hand was covered in chocolate.)
I repeated this until all the chocolate was used up:
I was almost done…the last step was rolling the truffles in ground, toasted hazelnuts (you can also use cocoa). To do this, I placed the ground toasted hazelnuts in a bowl:
Then, I took each truffle and warmed the outside up by rolling it about in my hand. Next, I rolled the truffle about in the ground hazelnuts. Once its outside was coated, I placed the truffle in a little paper cup:
I repeated this until all the truffles were coated, here they are:
Ta DA! They’re ready to be devoured! Rich dark chocolate truffles with soft cream cheese centres!
Loads of people I’ve met and blogs I’ve read tell me to buy a can of re-fried beans at the store when I am making burritos or quesadillas or whatever else I might be making that call for re-fried beans. Not being Mexican myself, and never having researched the issue, I assumed it must be difficult to make good re-fried beans at home, that there must be some secret to it.
Then, I talked to one of my best friends who happens to be Mexican and she told me that I was most certainly misinformed. This friend of mine happens to live in a wooden hut, a-top some wooden stilts, in a little village in Panama, with an indigenous community called the Embera-Wounaan. I shall write more about this later, I promise.
Here is her house:
A hut in an Embera-Wounaan village in Colon Province, Panama
While I was visiting her in Panama, we talked about re-fried beans and she even suggested making some right there in her little hut. And so we did!
Re-fried beans for breakfast!
We had the beans with eggs for breakfast, and they were delicious, even though we had no cheese (there is no electricity in the village and hence, no fridge). Oh and we also had fried sweet plantains, which in my opinion, are overrated.
This homemade re-fried beans adventure really encouraged me, so when I was back in North America, I did some general research on making re-fried beans, namely, the process, spices etc., and then proceeded to make some myself.
Spicy homemade re-fried beans
You should try it too! Here is my recipe!
(I based this recipe off my friends’ recipes, but I tweaked the quantities of the spices (you guessed right, I increased them) and incorporated some of the useful tips and information I got from my internet research.)
What you will need:
1 cup beans (you can use kidney beans, pinto beans or black beans)
Water
3-4 tablespoons ghee
1 medium sized red onion
2-3 cloves of garlic
2 small (or one large) jalapenos
1 teaspoon cayenne pepper
1 tablespoon red chill Powder
1 tablespoon cumin Powder
Two handfuls of (I use either cheddar or Chihuahua (this is one aspect of the recipe I need to do more research on. I need to find out what cheese is best for this recipe!))
Cilantro/Coriander for garnish
Preparing the beans:
Soak the beans in plenty of water (at least tree times as much water as beans) overnight or at least 7 hours. This soaking is important; if you don’t soak the beans, they won’t be soft enough and the result won’t taste as good. There are allegedly short cuts to this, but I don’t believe they can produce the same results.
The next step is to cook the beans. Here’s a little tip, don’t use the water the beans were soaking in, to cook them. This water contains ‘oligosaccharides’ released from the beans, and they cause.. eerm.. flatulence! If you don’t follow my advice, there is always this yoga pose:
Pavanamukta Asana (Wind-relieving pose)
(Image by The Holistic Care Yoga Wiki. The above image is CC licensed, for more information go here.)
It’s a pretty easy pose, but it’s also easy to just throw the water out 😉 . So with fresh water, cook the beans in a pressure cooker until the cooker whistles about 4 times. If you don’t have a pressure cooker, you can simply boil them, it’ll just take longer. If you’re cooking them in a pot with water, the beans will be done when you can take one out and squish it between your fingers. I suppose you could use canned beans instead of going through all this trouble, but I am somehow not a big fan of things in cans. I feel, and obviously this is subjective, that beans from a can don’t taste as good as beans that have been soaked and cooked.
Method:
Finely dice the red onion, crush the cloves of garlic, and chop up the jalapenos.
Now we begin cooking! Start with some oil or ghee (Indian clarified butter) in a frying pan. (Apparently, what makes really great re-fried beans is cooking with lard. Since I am a vegetarian, that was not an option for me. But, it turned out quite well when I used oil, it also worked well with ghee.) Since I believe in Ayurveda (an ancient system of Indian medicine see here for more) I actually prefer cooking with ghee; it’s supposed to be healthier than oil. If you’d like to read my recipe, go here.
Of course a Mexican might be bemused or even annoyed by this bizarre substitution, but I think fusion and playfulness in cooking are good, as long as you are aware of what you’re doing, and acknowledge how the recipe or method has been changed. This ensures that you are more aware of how these changes affect the end product and this makes you a better cook. (I didn’t mean to sound preachy here, it’s just that I feel strongly about the difference between being playful and creative on the one hand, and being just, well, plain lazy, on the other.)
Anyway, I really ought to get back to writing about the beans eh?
When the oil is all heated up, add the diced onions and cook until slightly browned.
Now it’s time for the Jalapenos and garlic.
Once they’ve cooked for a few minutes, add 1 tablespoon each of cumin powder and chilli powder and 1 teaspoon of cayenne pepper. Mix it all up and fry until you smell the spices. Mmmm the fragrance will make you hungry!
It’s time for the beans! Add the cooked beans to the pan and let them cook for a while. Until they go from this:
To this:
Add salt to taste.
Now taste it and see how you like it. If the flavour is rich and intense, you can stop cooking the beans. If you think the beans taste like they could use a little more cooking, add a little of the water left over from cooking the beans to the pan, and let the beans cook some more. When you think the beans are done, turn the heat off and add a handful or two of grated cheese to the pan. Mix it all up until the cheese is melted and evenly mixed in.
Your beans are ready. Garnish with coriander/cilantro and enjoy!
I’ve use these re-fried beans in enchiladas, burritos and tacos, I’ve even made a re-fried bean-pizza. But most often, I like to just scoop some beans onto a plate and go at them with a spoon 🙂
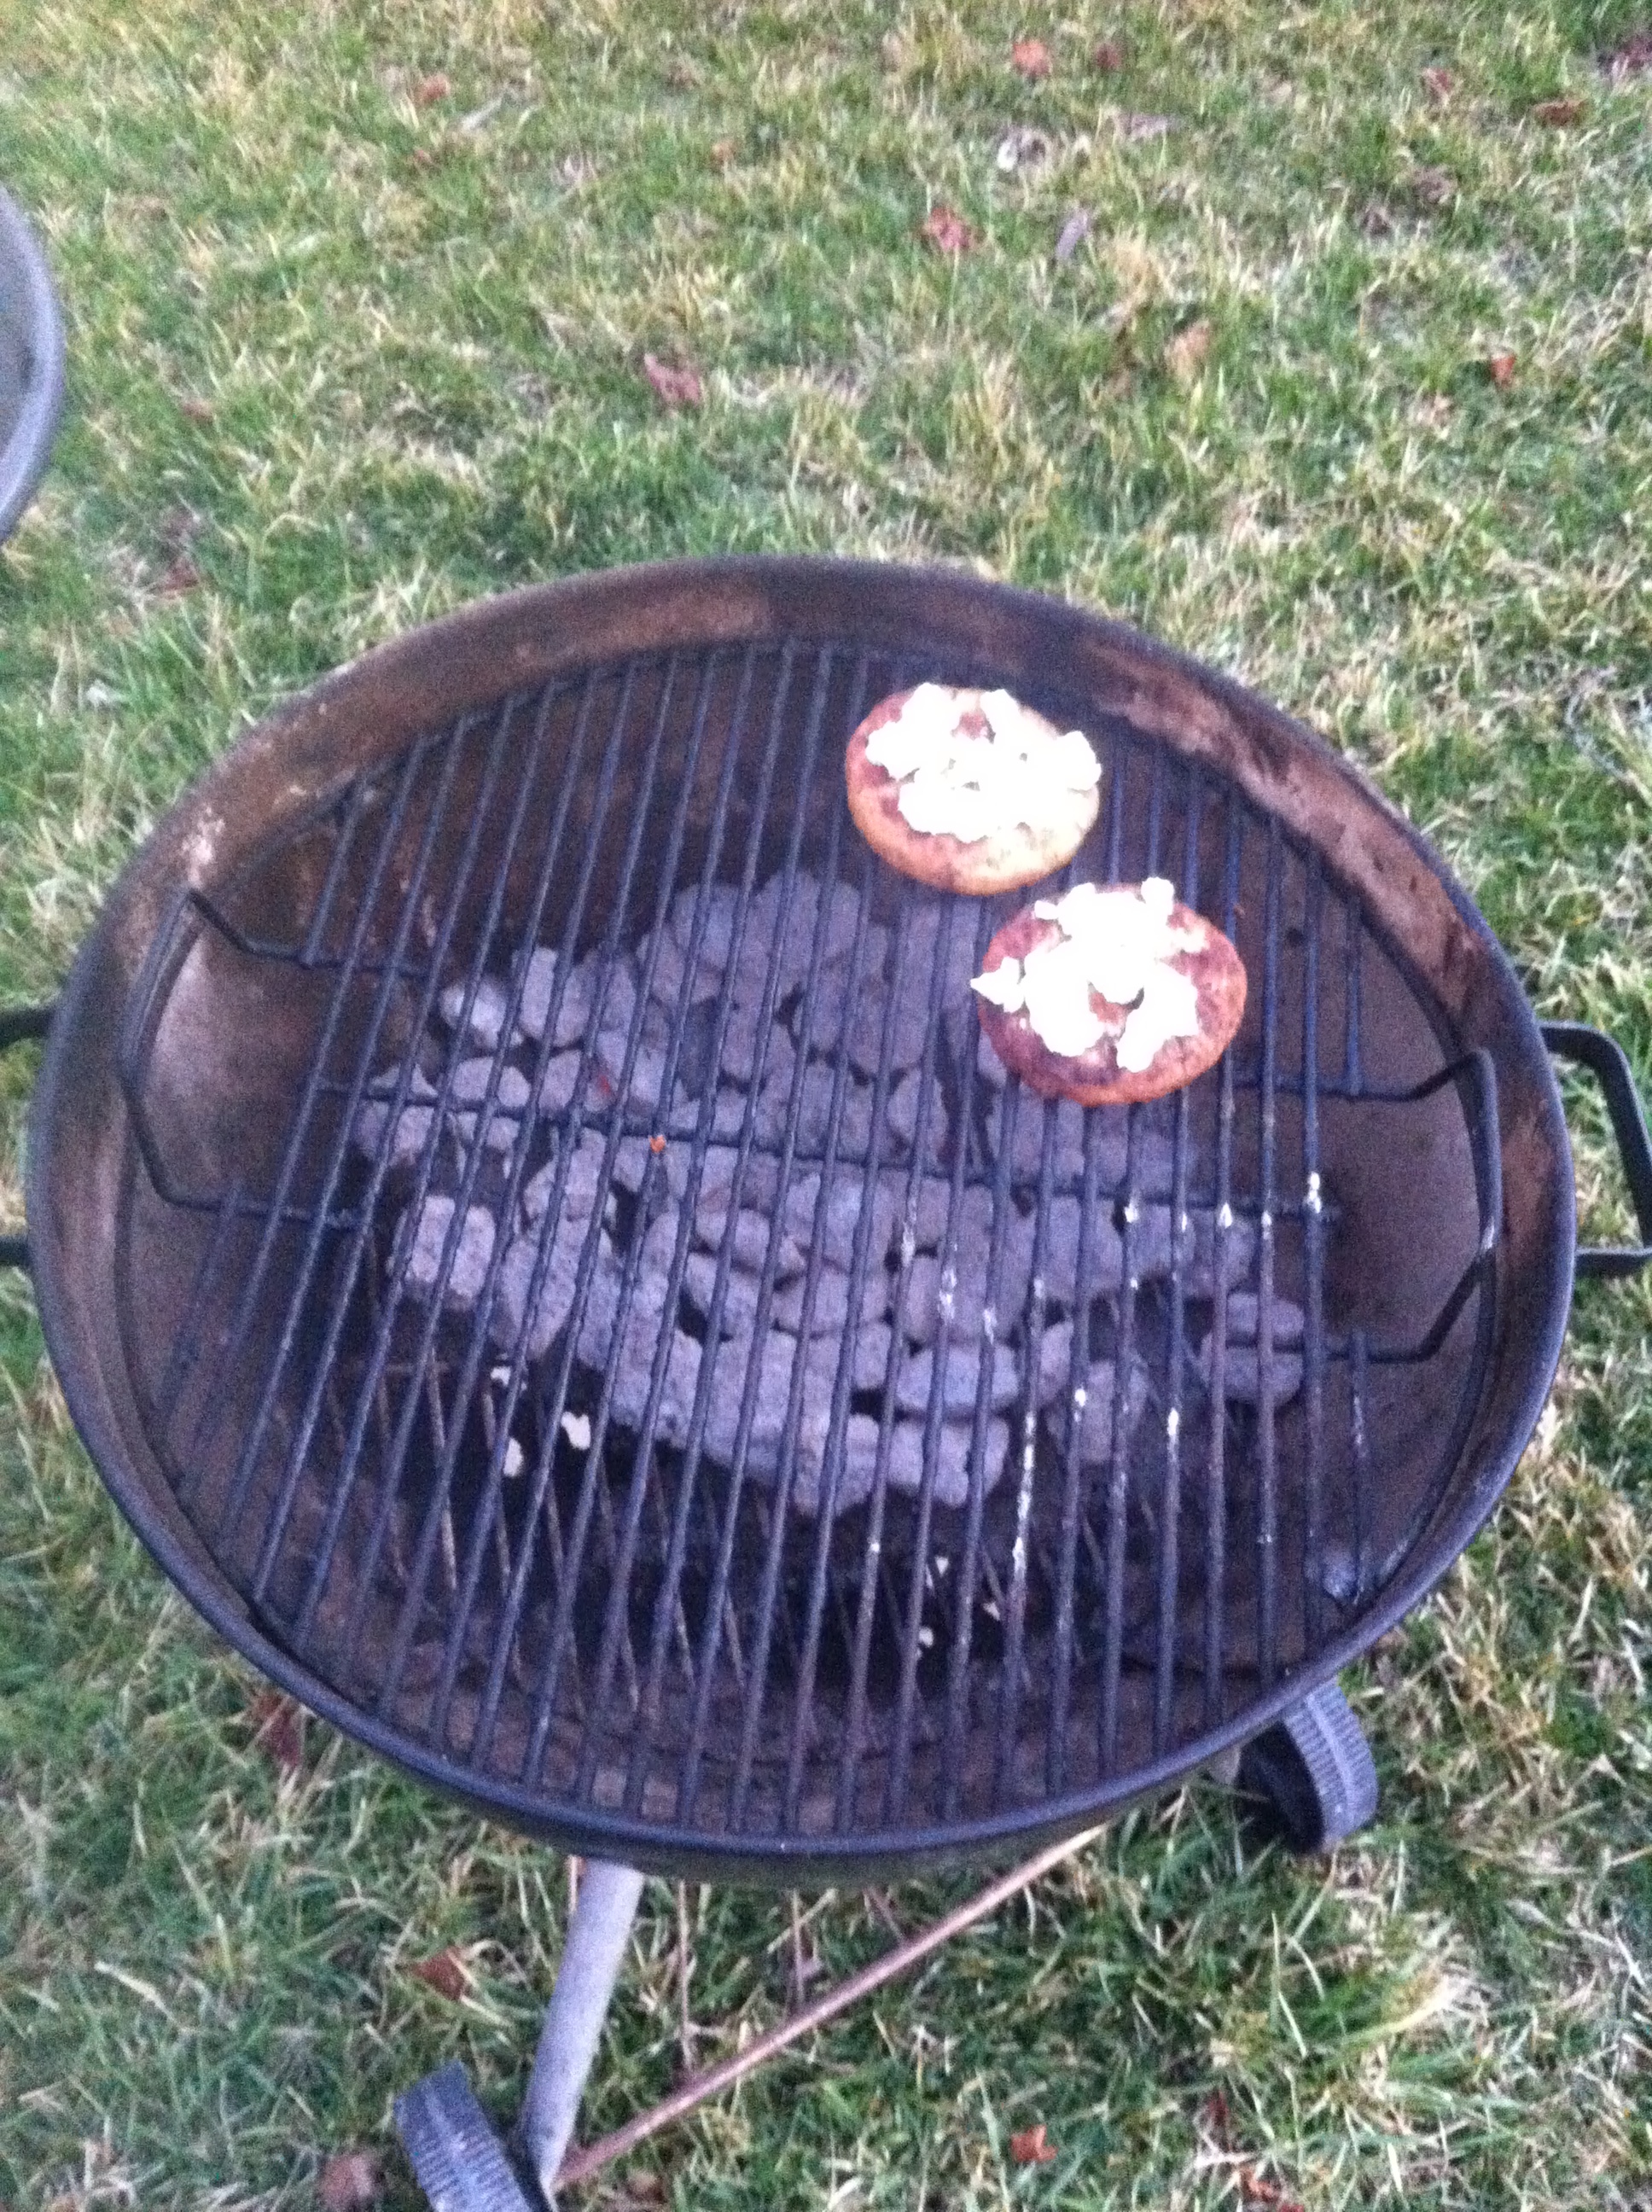
Yay! Spring is here and it’s warm enough to grill already! To celebrate, we grilled salmon burgers from Whole Foods (some day, i am going to make burger patties at home, I’ve decided!) for dinner this evening.
Mine was served with whole wheat bread, fresh basil from the indoor potted basil plant (pictured in a previous post) and, goat cheese. I thought about the sort of cheese we should use, and decided I would give goat cheese a try. So I used soft, fresh goat cheese.
Mmmm! Despite some opposition to goat cheese that my friend offered, the burger turned out well and went perfectly with a Belgian white beer. The beer had notes of coriander and a citrussy flavor as well, so it was very fresh and went with the ‘spring is here’ theme of the evening.
The truth is, the burger was so good that I ate two! I also drank 2 beers. It didn’t help that I’d had a pre-dinner snack that consisted of Denali Extreme Maximum Fudge Moose tracks ice cream with hot fudge on top. I felt bloated and ill for 2 whole hours after dinner. I am a disturbingly greedy person. Sigh.
Anyway, I can’t wait for the summer! More burgers, salmon steaks and, most importantly, I can make paneer tikka, achaari fish tikka and tandoori fish again! You can make these awesome Indian dishes indoors in an oven, but they just don’t taste right that way. They need to be grilled in a type of Indian oven- a tandoor, and I it turns out a BBQ grill is the next best thing! So, for the summer I can hardly wait!


 with Rice")
")

")


")