Categories
Baking Chocolate Food Indian Cooking Recipes

How to Break AND Fix a Chocolate Ganache

I am taking chocolate fudge cupcakes to a friend’s birthday party tonight! I baked them late last night and took a break from work this afternoon to frost them. I decided to fill them with dark chocolate ganache and top them off with either Gianduja chocolate frosting or Peanut butter-cream frosting. I will write about how the cakes turned out soon enough, this post however is all about the ganache. More specifically, it is about how to break a chocolate ganache and then, fix it. Why, you ask, would you want to know how to break a ganache? Well, because then you’ll know what not to do when YOU make your next ganache, of course. And if you manage to break your ganache in a unique and entirely different manner than the one chronicled below, why then read on, and you will find how to fix it!

A dark chocolate ganache should taste smooth and rich. This is how it should look:

Chocolate ganache
This is how a chocolate ganache ought to look; a broken ganache will look oily and goopy not smooth and even like this.
Unfortunately for me, things went horribly wrong. I ended up with an awful, goopy, oily mess. I didn’t take a picture of it, but here is a link to someone else’s photograph of a ruined ganache that looks very much like mine did.

I think this might be because I added cold vanilla extract from the fridge, when in fact, I should have ensured that it was at room temperature.

I panicked and tried various ways of fixing it. First, I heated it on low in the microwave. When that didn’t work, I tried heating it in a double boiler. Finally, I tried to fix it by adding a few tablespoons of warm milk one at a time. After each table-spoon, I gently stirred the mixture with a whisk. And Voila! It worked! Here is what I ended up with:

Fixed chocolate ganache
Fixed, but slightly thin, ganache
It is smooth and even, the way it out to be. However, the mixture is a bit thinner than my previous ganaches have been. It’ll firm up in a bit I am sure, and since I am using it as a filling for cupcakes this might even be a happy accident, as it might be nice to have a softer filling inside the cakes. On the other hand, if I was going to be making truffles with this ganache, I might have a problem on my hands.

Ps. I washed my hands before I dipped my finger in that ganache!

Categories
Baking Chocolate Cooking Food Recipes

An Incredibly Simple Chocolate Mousse Recipe (It’s about as healthy as something chocolatey can get!)

I am somewhat infamous amongst my friends and family for my chocolate obsession (it’s not hard to see why). As a result, my friends often send me chocolate-related recipes by email, Facebook etc. I am always grateful for these messages from them, if nothing else because it means they thought of me. But last week, my friend Zoe posted a link for a chocolate mousse recipe on my Facebook timeline that has entirely changed the way I look at chocolate!

When I first saw the recipe, I thought it seemed too simple to be true. Despite my skepticism, my curiosity got the better of me and I decided to give it a try sometime in the near future. As it turned out, I woke up today to find I was out of the Cointreau chocolate truffles I recently made, so, desperately needing my chocolate fix, I decided to try the mousse recipe out. The method employed in this recipe was invented by Herve This, who is a French chemist and, well if you ask me, also a French magician! It turns out this truly is a miracle method/recipe! I am not just being hyperbolic; I mean it. Here’s why:

1. The basic recipe has only has two ingredients: chocolate and water.

2. Although this point is essentially redundant given point 1, I just want to emphasize the fact that the recipe does not call for cream, butter or sugar! So it is pretty low-fat and healthy, for a chocolate mousse recipe.

3. The process is fairly simply, all it needs is a bit of whipping.

You’re amazed aren’t you? Well give it a go, I promise it’s easy and the result is delicious! But before I go on, I just want to add a little caveat to all this. I say this recipe is low-fat because it doesn’t call for cream, butter etc. Having said that, it is still a chocolate mousse recipe. Even though it contains only chocolate and water, chocolate, even dark chocolate contains quite a lot of calories. So this mousse is still considerably more fattening than say just eating some fruit for dessert. So eat it in reasonable quantities.

(I know, I know, you’re calling me a hypocrite now, but YOU, my dear reader can, and should, aspire to a healthier, more sane lifestyle than I adopt, surely!)

I used Heston Blumenthal’s recipe as a base but changed the quantities a little, and added Cointreau for a little extra oomph. Here are the instructions for my version:

Equipment:

1 Saucepan

1 large bowl and 1 smaller bowl

Ice

A whisk

Ingredients:

250g good dark chocolate (I used Godiva chocolate with 72% cocoa solids)

220 ml water

2 tbsp Cointreau (you could also use Grand Marnier)

Cocoa powder and finely grated orange peel for decoration

(The exact quantity of water that you will need varies a little with the room temperature in the room and ice bath, and the particular chocolate you use, so you might have to tweak these measurements. Once you try the recipe out, you’ll get a sense of it and you might find you need to add another tablespoon of water, or reduce the water in the recipe by a bit.)

Method:

Chop up the chocolate on a cutting board into fine bits with a large knife. I have a food processor, so I just break the chocolate up into individual squares and then throw it into the processor. The reason you want the chocolate broken up into fine bits is because you want it all to melt easily when you heat it. Chocolate burns easily, so you’ve always got to be careful when melting it.

Take the larger bowl and fill it with ice and cold water. Place the smaller bowl in this bigger bowl on top of the ice. The bottom of the smaller bowl should rest on the ice.

Next pour the water into a saucepan, place the pan on the stove and turn on the heat/flame to low. Now add the chocolate and Cointreau. With the whisk begin mixing the chocolate, liqueur, and water. Once the chocolate is melted, pour it into the small bowl sitting in the ice-bath. Start whisking the chocolate fairly furiously. It will slowly thicken.

Watch the video below to get an idea of how much to whisk it and when to stop (the whisking bit is from around 1.15 to 1.45).

It’s important not to overdo the whipping; if you do, you won’t end up with a mousse-like consistency. I made that mistake the first time around 😦 and I ended up with a dry mess that looked like this:

If you overdo it, you can melt the chocolate again and repeat the whipping process.

When you have the right consistency, you should stop whisking immediately and serve the mousse. I used an ice cream scoop to gorge some out and then served it on a plate like this- lightly dusted with cocoa on top:

Another option is to scoop into little serving bowls like this. Again, I dusted the top with cocoa powder and then garnished with finely grated orange peel. I’ll probably take of the orange bits before I eat it though, so this is a purely decorative addition.

Categories
Chocolate General Recipes

Cocoa Body Butter that Will Make you Swoon!

Today, I am going to be writing about food without writing about food. “How”, you ask, “is this possible?” Read on my aspiring domestic goddesses and gods and you will see!

In a previous post (a recipe for chocolate brazil-nut butter), I raved about The Body Shop’s brazil-nut body butter. While this is my favourite flavour, a close second, is their cocoa butter body butter. Despite how much I love this product though, the truth is that I’ve always wanted a body-butter that was even more, well cocoa-ey. (By now, if you’ve been reading one or two of my blog-posts, you know that I am definitely not a “less is more” type of person; more is definitely better in my book!) In the past, I’ve made my own body and face oils, having been inspired and coached by an old friend of mine, Ralph, who now practices naturopathy and Ayurveda in South Germany. So the concept of making my own skin-products isn’t entirely new to me; I’ve just never gotten around to it.

Then, in December last year, before I pushed off to India for the holidays, I had friends over for dinner, and one of them mentioned making her own lip balm. This got me thinking, and I resolved to make my own body butter someday. And then, I promptly tucked away said resolve somewhere in the back of my mind and forgot all about it. What with packing, flying to India and having wildly inappropriate dance parties with my insane family (and by this I mean my parents, Aunts, and Uncles happily prancing about to bollywood dance music with us young’un’s), I just didn’t have the chance to give it a go.

And then today, I woke up with a rather inexplicable craving for homemade body butter. It may have something to do with an email I got yesterday from The Body Shop asking me to “Indulge in Chocomania: it’s Sinfully Good and Totally Guilt Free”. Guilt free? Really? Not when I am spending what is literally my entire week’s entertainment budget on lotions and potions that smell like the food I would be buying if I had any money left!

So I went out exploring in my neighborhood and bought some pure shea butter and cocoa butter. And then, I made my own, deliciously decadent body butter and I am not exaggerating in the least when I say that the smell, texture, and look of it had me giggling, smiling and babbling excitedly.

The first whiff of it was absolute, pure delight. Try it and you’ll see what I mean!

Equipment:

A double boiler or a microwave

Hand-held mixer or whisk

One medium bowl and one large, deep bowl

Jars to put the body butter in

Ingredients:

(All the ingredients I used were organic)

100 ml pure Cocoa butter

50 ml pure Shea butter

2 tbsp Vitamin E oil (at least 2000o IU)

3 tbsp Sweet Almond Oil

1/4 to 1/2 tsp Vanilla Essence or Vanilla Oil

1 Tbsp Mineral Water

Method:

You can buy cocoa butter in the form of “chips”, or in a jar. If you buy it in a jar, you might have to place the jar in warm water for a bit, just to soften it up a bit, before you take it out. I placed both the shea butter and cocoa butter jars in a bowl of warm water in the sink for about 5 minutes.

Now measure out the cocoa butter and shea butter into the medium bowl and place it in the microwave. I would heat it on a very low setting (time defrost) for about 20 seconds at a time, checking on it periodically. You want the butters all melted and looking like this:

It’s important to do this carefully as you don’t want to overheat the butters. Once the butter-mixture is nice and melted, stir it a bit and place it in the freezer for 5 minutes to cool down. Then, add the sweet almond oil and vitamin e oil, stir and put the mixture back in the freezer for another 5 minutes or so, until the mixture has firmed up. Once firm, take it out, add a tablespoon of water and using the hand held mixer or whisk, beat the mixture.

At this stage in the process, I was taking in the wonderful smell when I realized the only thing that would make this smell better would be vanilla essense. Since I bake a lot, I had some lying about, and so I added 1/4 tsp to the mixture and whipped it up into a wonderful, light, creamy and delicious smelling mixture πŸ™‚ When I smelt it, I felt it needed some more vanilla, so I added another quarter teaspoon. On a side-note, I would have used vanilla oil if I had some around because vanilla extract has alcohol (which dries the skin). However, if you don’t have any lying about, I am sure the essence is fine, since you’re using such a small quantity of it.

When you feel it’s suitably fluffy and you’re happy with the texture, scoop the mixture into clean, dry jars!

And there it is, your very own, delicious body butter that will have you smelling like something you want to eat. I am not sure why I want to smell like something I’d eat, I just do! It makes me wildly happy and if this sounds like the sort of thing that makes YOU cheerful, go ahead and give it a go- it’s easy!

Categories
Chocolate Chocolate Truffles Food Recipes

Cointreau Chocolate Truffles

Cointreau chocolate truffles

This was my latest chocolate experiment: Cointreau Truffles!

How did I settle on this particular flavour? Well, I bought a whole bottle of Cointreau at the Delhi International Airport last month you see. And today, wanting to make a new type of truffle I looked about my kitchen, and my eyes fell upon the bottle. I was torn between trying out Cointreau truffles and red wine truffles; in the end this seemed like a better bet. It turned out to be a good choice; they were delicious!


Equipment you will need:

A cutting board and knife OR a food processor

2 medium-sized bowls

A grater or citrus peeler or vegetable peeler

2 plates

Parchment sheet or wax paper (at a pinch, you could use aluminium foil)

Little paper cups to put the truffles in, preferably orange paper cups

Silicone Chocolate Mold (optional)


Ingredients:

8 Oz (approx 225 g) good dark chocolate (at least 70-80 % cocoa solids)

1/2 cup cream (whipping cream in Canada or heavy cream or double cream elsewhere)

2 pinches of salt

1 tbsp Cointreau (you could probably also use Grand Marnier)

1 orange

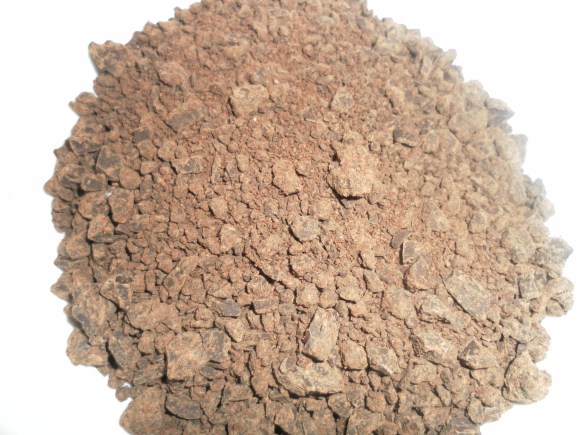
A few tbsp of cocoa powder


Method:
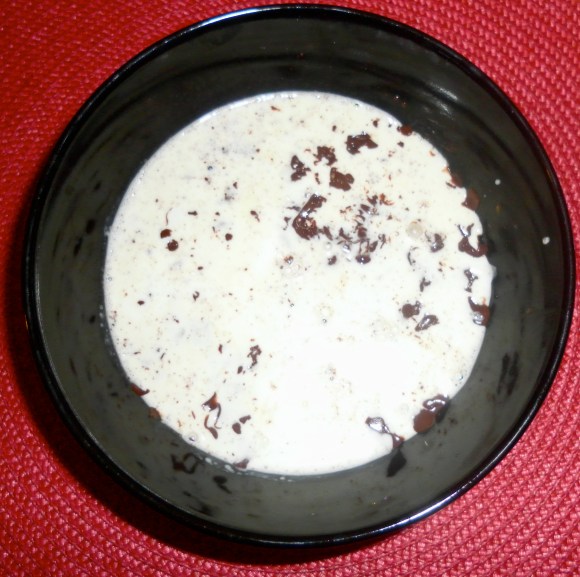
1.Peel or grate the rind/peel of the orange. Get the half cup of cream to a gentle simmer and immediately turn off the heat. Add the orange zest to the cream and let it steep for about an hour.

2. In the meantime, chop up the chocolate on a cutting board into fine pieces with a large knife. This is the tiresome part of the recipe. I have a food processor, so I just break the chocolate up into individual squares and then throw it into the processor. The reason you want the chocolate broken up into fine bits is because you want it all to melt evenly when you pour in the hot cream. Throw the chocolate bits into a bowl.

Chopped up chocolate to make a ganache

3. Once the orange peel has steeped in the cream for about an hour, re-heat the cream again to a gentle simmer, and pour the hot cream through a strainer into the bowl with the chocolate. Using a ladle, make sure all the chocolate is covered by the cream.

Making a chocolate ganache for chocolate truffles

4. Let it sit for 2-3 minutes. Then add the Cointreau and salt, and delicately fold the mixture. It’s important not to be rough because then you will get air bubbles into the chocolate. That wouldn’t be good as you want the chocolate to taste smooth and rich. You might also break the ganache (see this post for more on this).

Gently mixing the chocolate ganache

Chocolate ganache

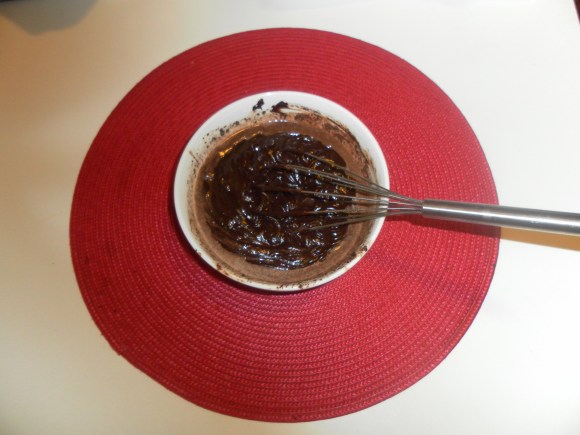
5. Once you have a smooth mixture (this is called chocolate ganache), place the bowl in the fridge for about half an hour, until it firms up. The length of time you will need to leave it in the fridge will depend on the temperature inside your fridge, so keep checking on it. You want the ganache to be just firmed up, but not hard.

How to shape chocolate truffles

(That cow looks like she wants some of that delicious ganache :P)

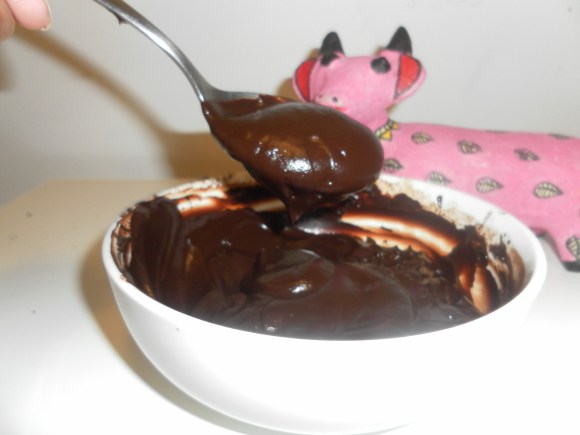
6. In the meantime, take out the plates and place a sheet of parchment or wax paper on each of them. Once the chocolate mixture is ready, take it out of the fridge and spoon out the chocolate in small portions onto the parcement or wax paper. The portions should be approximately the size you want the truffles to be.

Making assorted chocolate truffles

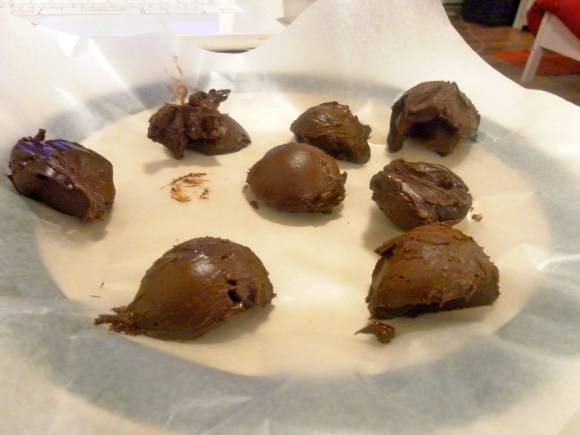
(As you can see, at this stage, things look pretty messy, but that’s ok. You will be able to roll them about in your hands and slowly work them into fairly smooth and nice looking spheres.)

7. Now, roll each scoop/portion of chocolate about in your hand until it is more or less spherical, then place it back on the parchment. I would recommend washing your hands periodically, while you do this, as you will get chocolate all over them, and it will be more difficult to shape the truffles if you’ve got melted chocolate on your hands. Also, the washing will help to cool your hands. The truth is, I have to wash my hands periodically anyway because I can’t resist licking some of the chocolate off every once in a while πŸ˜‰

Masala chai/black-tea flavoured truffles

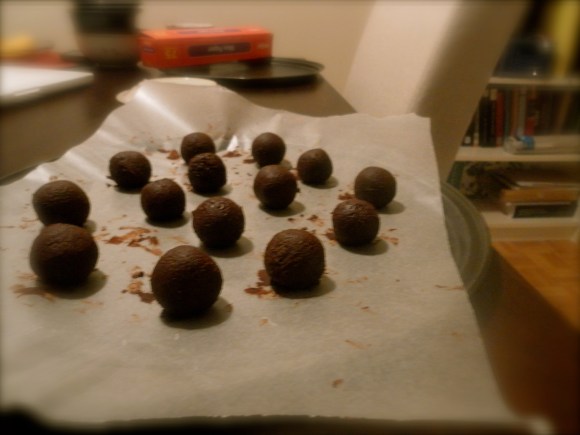
8. Once you’ve shaped all the truffles, take another bowl and put about 2 tbsp of cocoa powder in it. Take each truffle in your hand, roll it about for a second or two, just enough to warm the surface and then roll the truffle in the cocoa powder, until it is covered. Finally, place it in a paper cup. Repeat until all the truffles are done. I’ve heard it being said that this process can be messy and/or arduous; I didn’t think it was either. This was the sum-total of the mess I made:

Making chocolate truffles is not messy!

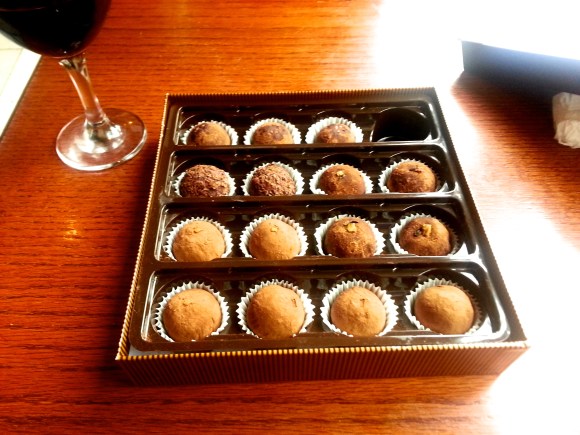
This is how your truffles should look:

Cointreau Chocolate Truffles

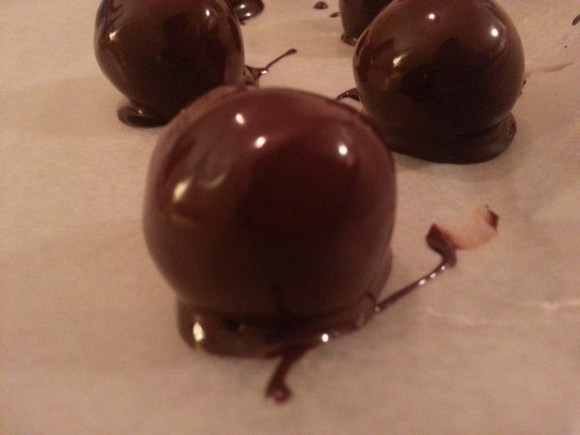
9. If you don’t like the slightly rustic look of the cocoa, you can also dip the shaped truffles into melted chocolate. That is, once you’ve shaped the truffles in Step 7, skip Step 8. Instead, place the truffles in the fridge to firm up and, in the meantime, melt some dark chocolate in a double boiler or a fondue pot. Then dip the firmed up truffles in the melted chocolate, and place the truffle on a tray lined with parchment or wax paper. Let the chocolate harden and enjoy!

Cointreau truffles coated in dark chocolate

You could sprinkle some ground almonds on top to compliment the orange-y flavour πŸ™‚

Cointreau truffles

10. You can also make more professional looking truffles if you have a silicone mould, like this one:

Silicone mold for truffles

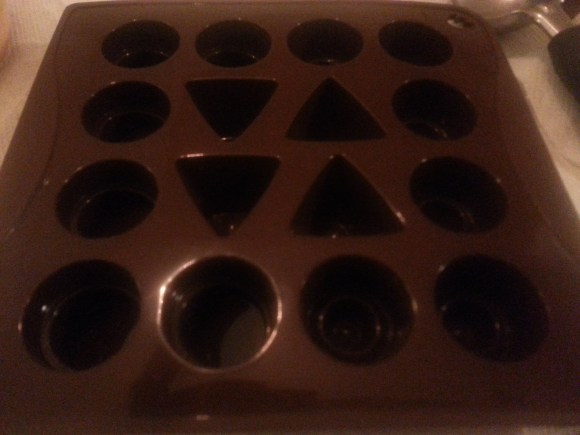
All you have to do with a mould like this is pour the ganache directly into it right after Step 4. Then place the mould in the refrigerator or freezer until the chocolate firms up, then pop the chocolates out of the mould.

Cointreau chocolate truffles

You can put the truffles in the fridge for two to three weeks.

They make for a great present, just put them in a nice box and voilΓ , you have a handmade personalized present! I, for one, know my mother would love this; if only she and I were in the same country 😦 I will make her a box for when she visits me though πŸ™‚

I also like to make up a box of assorted flavours:

Homemade truffles as a gift

If you’d like to try making a box of assorted chocolates, you could look for recipes on the Internet, or just be playful and invent your own. Here are some of my own recipes: basic dark chocolate truffles, masala chai truffles, sugar-coated truffles with orange-cream cheese centres, truffles with cream cheese centres, or truffles with mint butter-cream centres.
Or look at this detailed post about how to make multiple flavoured truffles for a gift box.

Have fun truffling πŸ™‚

Categories
Chocolate Chocolate Truffles Cooking Food General Recipes

Basic Dark Chocolate Truffles

So by now, I think it is fairly obvious that I love chocolate. However, truth be told, I’ve become sick of all the usual chocolate you can buy at the drug-store or supermarket- the likes of Lindt, Ghirardelli, Cadburys etc. I even, to be honest, am sort of over store-bought hazelnut butter- a.k.a. Nutella.

No hell has not frozen over, and no I have not been kidnapped by someone who is now pretending to be me on my blog so people don’t report me missing (if you are someone who is considering kidnapping me by the way, this tactic will never work, I talk to my parents and some close friends virtually everyday, so I would be reported missing if I didn’t answer my phone in 2 hours max.) “But Nutella is AWESOME” you exclaim or if you’re my mother or father, which you probably are if you’re reading this, you heave a sigh of relief, because until now you thought I was going to develop heart disease and diabetes and god knows what else at the very tender age of 29.

But don’t get too excited dear parents, I am NOT giving up chocolate. I am saying I am over this store-bought stuff because it’s too sweet and frankly not very good chocolate. If I could, I’d go eat pralines and truffles from Soma (this amazing chocolate store in the distillery district in Toronto) or Leonidas or Patchi or some other chocolate store that knows what they’re doing. BUT, the problem is, I couldn’t possibly afford to- considering how much chocolate I guzzle on a daily basis and considering I am but a poor doctoral candidate.

NOW I finally have the solution to this problem. Handmade, homemade truffles! And now that I’ve figured out how to make them, I simply cannot understand how I was ever able to eat that rubbish they call chocolate in supermarkets and drugstores.

In addition these truffles are the answer to my goldilocks-type problem with chocolate. My problem with most dark chocolate is that it’s not as creamy as milk chocolate; my problem with milk chocolate is that it isn’t chocolatey enough. Happily, one of the things that makes truffles magical is that they can be rich, creamy and smooth and ALSO have a strong chocolatey flavour.

If you’d like to discover true happiness as well, keep reading, because what follows, is a detailed narrative of how to make basic dark chocolate truffles.

Equipment you will need:

A cutting board and knife OR a food proccessor

2 medium sized bowls

2 plates

Parchment sheet or foil

Little paper cups to put the truffles in

Ingredients:

8 Oz (approx 225 g) good dark chocolate (at least 70-80 % cocoa solids)

1/2 cup cream (whipping cream in Canada or heavy cream or double cream elsewhere)

A dollop of butter (at room temp)

2 pinches of salt

1 tsp vanilla essence

A few tbsp of Cocoa powder

Method:

Chop up the chocolate on a cutting board into fine pieces with a large knife. This is the tiresome part of the recipe. I have a food processor, so I just break the chocolate up into individual squares and then throw it into the processor. The reason you want the chocolate broken up into fine bits is because you want it all to melt when you pour in the hot cream.

Throw the chocolate bits into a bowl. Next, get the half cup of cream just to a boil and immediately turn off the heat and pour the hot cream into the bowl with the chocolate. Using a ladle, make sure all the chocolate is covered by the cream.

Let it sit for 2-3 minutes and then delicately fold the mixture. It’s important not to be rough because then you will get air bubbles into the chocolate. That wouldn’t be good as you want the chocolate to taste smooth and rich.

Add the dollop of butter, vanilla essence and salt and mix gently. Place the bowl in the fridge for about an hour, until it firms up. In the meantime take out the plates and place two sheets of parchment or foil on them. Once the chocolate mixture is ready take it out of the fridge and spoon out the chocolate in small portions onto the parcement or foil. The portions should be approximately the size you want the truffles to be.

Place the plates in the fridge again for about 15 mins. Take the truffles out when they’re firmed up again and roll them about in your hand until they’re more or less spherical, then place them back on the parchment. You can also try to shape them as tear drops- but good luck with that, it’ll take patience. This part of the process is so much fun! I love it because the chocolate looks and smells delicious. I would recommend washing your hands periodically in between, as you will get chocolate all over them, and it will be more difficult to shape the truffles if you’ve got melted chocolate on your hands. Also, the washing will help to cool your hands.

Once you’ve shaped all the truffles, take another bowl and put about 2 tbsp of cocoa powder in it. Take each truffle in your hand, roll it about for a second or two, just enough to warm the surface and then roll the truffle in the cocoa powder, until it is covered. Then place it in a paper cup. Repeat until all the truffles are done.

Mmmm they will taste delicious. You can put them in the fridge for two weeks or more, but take them out a few hours before you serve them- so that they’re at room temperature.

These basic truffles were so good, that I’ve tried quite a few variations too, such as, dark chocolate truffles with hazelnut butter-cream filling; truffles with a hazelnut centre that are coated with toasted, crushed hazelnuts; and dark chocolate truffles with a hint of orange. I will post pictures and recipes of these variations soon!

Categories
Cats

Ridiculously Cute Kitties

Cute, adorable kitty videos like this need to be illegal! They’re like heroin, except anyone can access them easily at home, on their computers, iphones, television sets..they’re everywhere!! The next thing you know, one is hooked, unable to do any work, and desperately snuggling a pillow and biting it. All this whilst hoping desperately that some day, such cute kitties will belong to one.

Photos of kitties like this are also part of the problem:

Or THIS:

I want a kitty so badly. 😦 Unfortunately, I don’t have one. I am just a doting Auntie to my friends’ kitties, cuddling them, giving them presents, taking pictures of them and showing said pictures to strangers. πŸ™‚

Categories
Cooking Food Indian Cooking Recipes

Buttery Rajma (Kidney Beans) with Rice

Indian Kidney Bean Curry RecipeI woke up this morning, ok I lied, I woke up this afternoon with a craving. I really wanted to eat some Rajma Chaval. For those of you who aren’t familiar with this dish, it’s a staple all over India. Although, it’s primarily a North-Indian dish, I know plenty of South-Indians who love the stuff. It’s sort of like a dal (what some of you non-Indians call lentil curry) made with red kidney beans. Rajma refers to these beans and chaval (or chawal) simply means rice.

This is a very simple dish, it’s comfort food really. If you’d like to try this recipe out, here goes:

Ingredients:

1 cup dried kidney beans (see below for how to prepare these beans, you need to prepare them at least 7 hours before you start cooking)

1 tablespoon Ghee (Indian clarified butter) or oil (you can find ghee in an Indian store; if you’d like to make it at home, here is my recipe)

1 teaspoon cumin seeds

1-2 teaspoon grated ginger

1-2 teaspoon crushed garlic

2-4 Indian green chillies (I used dried red ones because I couldn’t find green ones in my neighborhood store)

2-4 Bay leaves

2-4 Cloves

1 pinch of Heengh (asafetida)

1 large onion or two small onions, finely diced. (red or white)

2 small tomatoes, or 1 large tomato, pureed or finely chopped (choose depending on whether you like small chunks of tomatoes in the rajma, some do, some don’t)

1-2 teaspoon red chilli powder

1/4 teaspoon haldi (turmeric)

1 teaspoon coriander powder

1 teaspoon cumin powder

Lots of butter πŸ™‚

Some cream (optional)

Coriander as garnish

Note: For some of the ingredients I haven’t listed a precise quantity because it’s really up to you how spicy you want to make the dish. You might also like one spice better than another one, so you pick and choose how much you want to add within the range I specified (you can of course add even more than the upper-limit of my range, but then I can’t speak to how the dish will turn out, since I’ve never tried it that way).

Also, I am using Canadian vegetables. Onions, tomatoes, garlic, ginger etc taste different in different countries and regions; they also come in varying sizes. You’re going to have to experiment a little and you may find that you have to tinker with the measures I have recommended.

Preparing the beans: Soak the Rajma in plenty of water (at least tree times as much water as beans) overnight or for at least 7 hours. This soaking is important; if you don’t soak the beans, they won’t be soft enough and the final product won’t taste as good. There are allegedly short cuts to this, but I personally don’t believe they can produce the same results.

The next step is to cook the beans. Here’s a little tip, don’t use the water the beans were soaking in, to cook them. This water contains ‘oligosaccharides’ released from the beans, and they cause.. eerm.. well..eerm flatulence! If you don’t follow my advice, there is always this yoga pose:

(Image by The Holistic Care Yoga Wiki. The above image is CC licensed, for more information go here.)

So anyway, back to the recipe. With fresh water, pressure cook the beans until the cooker whistles about 4 times. If you don’t have a pressure cooker, you can simply boil them, it’ll just take longer. If you’re cooking them in a pot with water, the beans will be done when you can take one out and squish it between your fingers. I suppose you could use canned beans instead of going through all this trouble, but I am somehow not a big fan of things in cans. I feel, and obviously this is subjective, that beans from a can don’t taste as good as beans that have been soaked and cooked.

Method:

We’ll start with one tbsp of ghee/oil in a deep, preferably thick-bottomed sauce pan that comes with a lid. Lay aside the following spices:

Spices needed for the Rajma RecipeLet the ghee/oil get got, then add 1 tsp of cumin seeds. The heat should be on high at this point. Wait for the seeds to begin splutter. Now add the bay leaves, cloves chillies and heengh.

When the red chillies change colour add the onions. Saute them until the become soft and brownish (as seen in the photograph below). Then add the chopped tomatoes (or puree). Next, add the red chili, turmeric, coriander, and cumin powders.

Stir well, put a lid on the pot and let the mixture cook on low to medium heat for about 5-10 minutes.

In the meantime take a few tablespoons of the cooked beans in a separate bowl and mash the beans up a bit. Once the tomato-onion-spice mixture has cooked for a while and the raw tomato smell has gone, add the cooked beans along with the mashed beans to the mixture. Then add as much butter as you think you can get away with (without feeling guilty) and stir well. Place the lid back on the pot and let the mixture cook on low for about 20-40 minutes.

The Rajma is ready! You can serve it on top of hot steaming rice, add a bit of cream (if you like) and then garnish with coriander leaves.

As I said before, this isn’t a fancy dish at all- it’s a simple recipe that reminds me of home.

Categories
Adventure Chocolate Food Reviews

Wonderful Chocolate Truffles in the Mid-West

I don’t want to sound like a pompous ass or anything. Really, I don’t.

You’re wondering why I am leading with this. You’ll know in a second.

So here goes: I’ve been to Switzerland more times than I can remember, lived in Germany and traveled around in Austria, France and Italy. And of course, I’ve eaten tonnes of chocolate in all these places. They are all known for making delicious chocolate, and I’ve had some exquisite chocolate in most of them. However, if you asked me where I’ve had the best chocolate truffles in the world, I’d have to say, and I promise that I am not doing this for shock value, the mid-west. Yes, you read that correctly, in the mid-west, of America. And no, I don’t mean Chicago. No, I mean non-urban, super-polite, sickeningly nice, mid-west America.

Where in the mid-west? Well, unfortunately, the place which sells these delicious truffles is sort of inconveniently located. It’s on the way from Ann Arbor to Chicago. It’s this little place called “The Chocolate Garden”. Here are the store’s contact details:

2691 Friday Road

Coloma, MI 49038-9712,

(269) 468-9866

To be fair, there are a few things wrong with the place. First, the name is awful because it’s utterly unimaginative. Second, the store itself isn’t particularly nicely done up or anything. Third, the truffles aren’t cheap- at least they’re not cheap if you’re a poor grad student. They’re about 3$ a piece. But, they are GOOD!

One upside is that the store is by a vineyard. We arrived there around sunset the second time we stopped there, and it’s was a beautiful sight.

Sunset glow on the vineyard
Driveway leading to the store; an abandoned barn.

I should have prefaced this review with something, so as not to be misleading you. So let me qualify the statement now. It’s perfectly possible that I am building this up preciselyΒ becauseΒ I found these truffles in an unassuming store in the unassuming mid-west.Β Maybe the story, the whole process of finding it off the highway, wandering in with low expectations and then having my mind-blown (quite metaphorically of course), made the truffles more flavourful to my tongue. I love stories you see. More than anything in the world, quite possibly even as much as I love chocolate (if you’re thinking I contradicted myself here, I did no such thing you little nit-picker, you! Chocolate is not of this world, it is divine. As for cats, they’re ueber intelligent alien-super-beings). And it wouldn’t be quite as delightful a story if I’d found these truffles in a store in Geneva, or somewhere in Belgium. So, maybe they aren’t, objectively speaking, if one can ever be objective about such things, theΒ bestΒ truffles I’ve had. But they were darned good, andΒ if you’re driving by, you should stop by.

Categories
Baking Chocolate Food Recipes

Dark Chocolate Brazil Nut Butter (better than Nutella!)(seriously!!).

As much as I love chocolate, I love nutty flavours- not more, not less, just exactly the same amount. Now, while generally the hazelnut has been my nut of choice (although walnuts are lovely too and well peanuts are as unexotic as they are delicious) I think I have a new favourite- the brazil-nut.

In one sense my brazil-nut love-affair began a long time ago. The body shop has these rich, creamy body-butters and my favourite has always been their brazil-nut body butter. It’s absolutely delectable. Anyway, although I loved this body-butter, I’d never really eaten a brazil-nut before, or baked/cooked with these nuts. Then, one lovely summer weekend, my awesome father came to visit. It was wonderful to spend time with him and we walked and talked together, all over the city. As always, he wanted to get me something special as a parting present as it were, and we settled upon a food processor. This is now my favourite toy. It’s amazing and it makes life SO much easier. I shall rant about said toy in another post though, this post is about brazil-nuts.

Anyway, the first thing I decided to make with my processor was home-made nutella. And this project turned out quite well indeed. So well in fact, that the next day, I was out of butter. This time I decided to be adventurous. “This body-butter smells delicious”, I said to myself, “if I like these lotions and potions because they are inspired by food that I love, does it not follow that I would love the food that inspired my most treasured skin-concoction of all??!!”

So I went to the store and bought 100 g of Brazil-nuts. This is what they looked like:

I used only 100g because I wasn’t sure how the experiment would turn out. Here is an account of how things turned out:

Other ingredients I used:

About a cup of icing sugar (it’s important to use icing sugar and not any other kind because you don’t want discrete crystals of it in your butter. You want the butter to have a smooth texture)

1/2 to 3/4 tsp vanilla essence

A pinch of salt

1 tsp or so of peanut oil

About 100 g of good quality dark chocolate

Method:

I began by toasting the brazil-nuts in the oven at 375 farenheit (that’s 180 celsius) for about 10 minutes, tossing the nuts once during this time. I let them cool, and then placed them in a tea-towel and rubbed them against each other until their skins came off. (This process is a little boring and repetitive, so I recommend watching some television or chatting with a friend while you do this.)

Once their skins were mostly off, I put the nuts in the processor and then just let it run for a while. You don’t need to add any butter or oil at all at this stage. Just let the processor do it’s thing. If you’re wondering which blade you should use, check the processor manual- it should tell you what blade/setting works for nut-butters. The nuts will first be crushed, then they’ll be ground to a fine paste and finally you will find them turning to butter. While the nuts are being processed place the chocolate in a bowl and melt it in the microwave. Be sure to do this on a low setting as you don’t want to burn the chocolate. Ideally, you should melt the chocolate in a double boiler to avoid this, but I find that if I am careful, I can do it in the microwave. Once the nuts are smooth, creamy and buttery in texture, stop the processor.

Add the salt, peanut oil, vanilla essence, half the melted chocolate and a few tablespoons of sugar to the butter. Run the processor. Stop and taste-test. if you feel it needs more chocolate or sugar, add some more and process again. Repeat the taste-test and sugar-chocolate adjustments, if necessary. I think it’s best not to follow a recipe in this regard, but to just wing it. As I said in an earlier post about my “universal dark chocolate icing“, each of us has very particular preferences, so why not try and make something perfectly suited to one’s own palate?

Once you’ve played around with the sugar-chocolate balance and found the perfect equilibrium between the two, and made sure everything has been evenly and smoothly mixed together, stop the processor. The butter will look and smell and delicious as you pour it into a jar or tupperware. Here’s proof of how amazing it looks at least:

“I should have made more!”, I lamented to myself. I really should have. And so should you! Double the recipe!

The texture is slightly thin, so if you’d like it thicker so you can spread it on bread etc., put it in the fridge. (I eat nutella with a tablespoon, not bread, so I don’t understand the other half of the population that eat’s it WITH things (unless it’s ice cream they eat it with, THAT I understand).) It’ll look like this once you put it in the fridge.

Ok, not exactly like this. Quite obviously, I got to this with a tablespoon FIRST and THEN realized I should have photographed it. Anyway, you get the idea about the butter’s texture.

All in all, this was deliciousness itself. It tastes absolutely incredible, way better than any nut-butter I’ve tried before.

Categories
Baking

Tea-party

The lovely teapot I got for my birthday. (Should I be upset I got a teapot for my birthday? I mean young, socially well-adjusted 20 somethingers don't normally get tea-pots for their birthdays do they?)

I am clearly a tea-party goddess! (I mean that in an entirely flip way, being even somewhat snarky about the title of Nigella Lawson’s cookbook (How to be a Domestic Goddess). I am not in fact in the least bit interested in being a goddess and am perfectly aware of the various implications and connotations attached to the use of the word “goddess” especially in a domestic setting. Phew. I just wanted to put that out there, as some of you don’t know me that well, or well, know me at all. Anyway, back to what I was saying..) I had some friends over for tea today, and they seemed to like the nutella cake I talked about in an earlier postΒ quite a bit. In fact, my tea party was such a hit that they stayed until midnight. That is odd for a tea-party, especially considering the fact that I didn’t even serve wine or any other alchocol. So really it must have been the scintillating conversations we had, or my cake πŸ™‚

I just thought I’d let you know that the cake was well-recieved, so, all you goddesses and gods out there who were planning on trying it out, you really should!